Corporate Account Branches
Branches are workplaces at lower levels opened outside the main center. Address-branches are used to send to different addresses in shipping and invoice transactions.
Path: ERP > Sales-Distribution > Customer-Supplier > Corporate Accounts > Corporate Account Detail
To add an address branch, click on the Other > Add Address-Branch link from the links at the top right in the corporate member detail. You will see the address-branch adding screen;
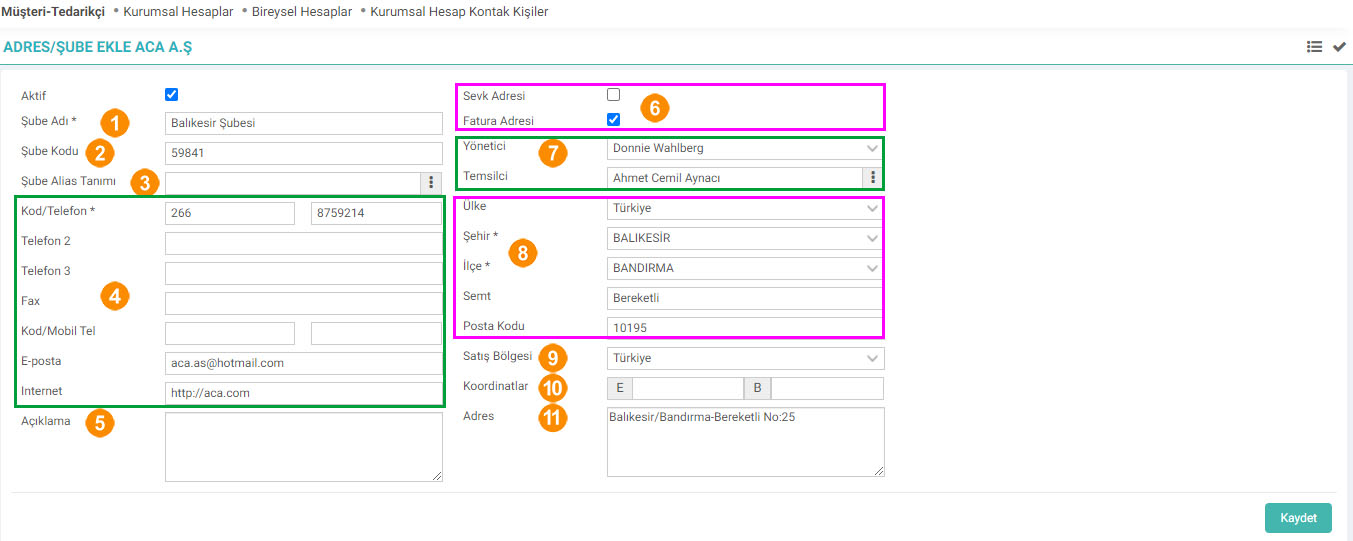
If the branch you added is actively operating, select the "Active" box.
Enter the name of the branch you added in the Branch Name field.
Enter the code of the branch you added in the Branch Code field. The data you have entered in the branch name and branch code fields will be included in the invoice when you select this branch.
Branch Alias Definition: A company can have branches in more than one location under a single TIN. In this case, the alias selection must be defined here and the invoice must also be selected. The alias definitions in the popup come from the Revenue Administration.
Enter contact information in this field.
You can enter detailed information about the branch in the Description field.
Click the Shipping Address box to use the information written in the Address field as the shipping address, and the Invoice Address box to use it as the billing address. Check the box.
Select the branch manager and representative from this field. Note: Employee names registered with the corporate member are displayed in this field. If you have not registered the branch manager yet, leave this field blank. Then, register the branch manager as an employee and select the relevant manager from the branch update page.
Enter the branch address information in this field.
Select the sales region of the branch from this field.
If you wish, you can define the coordinates in the Coordinates field. In this case, the coordinates will appear automatically when the branch is selected on different screens.
Define the full address in the Address field.
Click the "Save" button.
The branch name you registered will be listed in the Addresses/Branches section on the corporate member page.

Branch Detail

In order for the employee to come, the relevant branch must be selected in the employee detail in the
Branch Employees field. When you click on the employee, it will direct you directly to the employee information.
To Add Notes: Click on the "+" sign opposite the Notes text. On the screen that appears, enter the note title and note and save.
At the bottom of the "Notes" text, the notes added to the page are listed with their titles.