Debt/Credit Breakdown
This is the page that allows viewing and printing the debt, credit, and balance reports of your current accounts within the specified criteria range.
Route: Finance-Accounting > Current > Debt/Credit Breakdown
It has been developed in order to provide easy access to the answers to questions such as which company has how much debt and how much it has to pay, after entering the balances of customers, employees, suppliers of all monetary transactions making current transactions, and payments such as invoices and expenses.
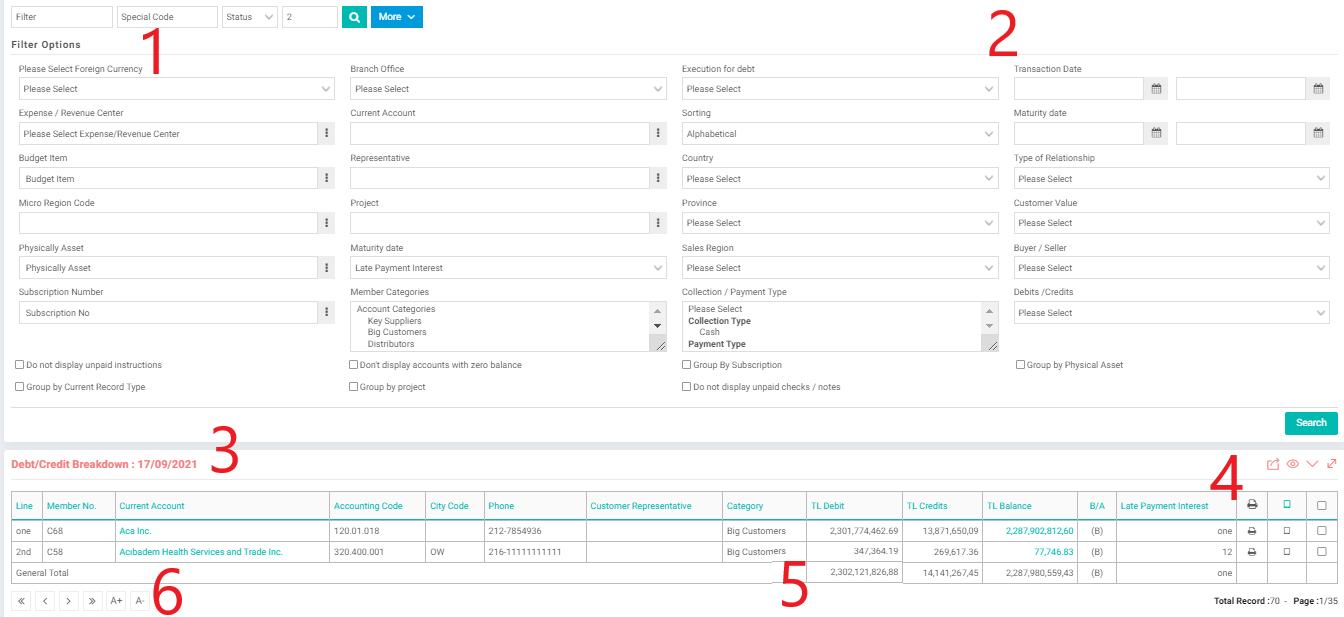
1- Filter
Filter: Search can be made according to Current Account and Member Number information. It is not case-sensitive.
Special Code: You can list the system according to the special code you created during the Member Registration phase. Special codes are created during member registration, if there is a code to be used to classify members among themselves, to find them in the filtering area, or if there is any information you want to see on the member update screen.
Status: It allows you to view the records according to the current Active and Passive status of the registered members in the system. For example, a person currently working in the company will be seen as an active member in the system. If this employee quits his job, his relationship with the company will be terminated. In this case, the employee will now be seen as a passive member in the system.
Number of Listings: In this field, you must enter the maximum number of records you want to see on the result listing screen. Minimum:1, maximum: 999 records can be listed. When you enter letters, spaces, 0, and 999+ values, you will see the "Incorrect Record Number" warning.
Tip
Every member registered during the member registration phase will be actively registered in the system. When you go to the relevant member details from the Accounts, Contacts or Employees pages according to the category they belong to, and remove the selection from the "Active" checkbox and perform the update, the member will now become inactive.
Making a member passive does not mean that his record will be completely deleted from the system. In case of need, information on the process of the active member of the company can be accessed.
2- Detailed Filtering
When you click on the More button, you will see other criteria in the filtering area. Thanks to the filters under the button, you can search in more detail, and in this way, you can easily access the records in the ranges you want to find.
Do not display unpaid instructions: When you select this checkbox; If you have current customers who have been given a payment order but whose payment has not yet been made, their records will not be reflected in the debit statement. If you are making current transactions on your bank orders, you can use the "Do not display unpaid instructions" checkbox in the debt statement.
Do not display unpaid checks / notes: When you select this checkbox; If the current accountant has unpaid checks and notes, instead of reflecting them under a separate column in the debit breakdown, it adds the check/note amount to the debit balance. E.g; If the current client has a debt of 15,000 USD and an unpaid check/note of 5,000 USD, and if this checkbox is selected; In the document listed, the debit balance appears as 15,000 USD.
According to Manual Document Closing: When you select this checkbox; This allows you to search through manual payment settlements. Document closing processes can be performed automatically from the related modules or manually within the scope of authorization.
Don't display accounts with zero balance: When you select this checkbox; Current accounts with zero balance status are not included in the debit statement.
Group by Project: When you select this checkbox; It allows you to view the debit status of your current accounts associated with a project by grouping them on a project basis. When you complete the registration process by adding your relevant current account to the Company-Authorized field on the Project - New Registration screen, which can be accessed by clicking the "+" icon on the Projects page, your current account will be associated with the relevant project.
Group by Physical Asset: When you select this checkbox; allows you to view results grouped by physical assets.
Please Select Foreign Currency: All monetary transactions work simultaneously in three currencies on W3.
2. Foreign Currency: When you select the second currency, the system displays the debit-credit status of the currents in the second currency. Companies sometimes want to record and report all their transactions in foreign currencies such as USD or EURO, which are widely used in the world, due to their foreign partnerships.
Transaction Currency: Returns the debit status of the current transaction in terms of the currency type in which the transaction is made. When the trading currency is selected, the "Currency" parameter appears in the filtering field.
Currency: Brings the debit status of the current accounts in the selected currency. If you do not select a criterion in this field, the reports will be listed on the basis of System/Local currency. Every company is also a taxpayer. Currency in taxpayer countries is System/Local currency. Accounting records and statements must be calculated in local currency.
Expense / Revenue Center: This allows you to list by filtering where expense or income occurs for the current transaction. It is a logical grouping approach that can have a special meaning for the business where income and expenses occur. Organizational units such as branch offices, departments, business units, and teams can be Expense / Revenue Centers. Revenue expenses can be designed according to product and service categories.
Budget Item: You can list according to the budget item in which the expense or income for the current transaction occurs. It represents under which budget item the current transaction is created. They are logical groups that serve to separate income and expenses under budget categories. Budget items such as Stationery Expenses, Fuel Expenses, Manufacturing Revenues can be created.
Micro Region Code: Members under the selected micro-region code are listed. Before you can select a micro-region code, this definition must be made. You can view the existing Micro Region Codes or create a new record on the screen you reach by following the Route: Dashboard > System > Parameters > Micro Region Code steps.
Physical Asset: This allows you to view the debit and credit statements associated with the selected physical asset. Everything that is valuable for itself or creates value for its owner can be defined under the name of the physical asset. You can view the registered physical assets and create new physical assets by following the Route: PAM > Assets > Physical Assets steps. You can define an unlimited number of Physical Assets and associate assets with people and departments.
Branch Office: This allows you to view the results according to the selected branch office information. It represents the branch office where the current transaction is executed. Branch office definitions must be made beforehand in order to make a selection in this field. You can define a branch office or update existing branch office information from the screen you can access by following the Route: HR > Planning > Organization Planning > Branch Office steps.
In order to view the branch offices, you must have authorization from the relevant branch offices.
For this; Follow Route: Dashboard > System > Security > Employee Authorization Definitions. On this screen, you should go to the employee update screen, select the relevant branch offices from the "Branch Office Authorities" field and click the Save button.
Current Account: Brings the debit status of the selected current account. There are three basic relationships in W3: contacts and suppliers, account customers and suppliers, and employees. The monetary records of these relations are collected under the name of "Current Account". An employee or supplier may have more than one current account.
Representative: You can view the debt status records of the entered representative's name. It refers to the person representing the current account.
Project: Debit statements of the current account to which the selected project is associated are listed. When you click on Project Debt / Receivable Status from the tab menus in the upper right corner of the screen accessed from the project detail page, you will reach the debt receivables breakdown of the relevant project.
Maturity Date: Represents the period over which the debt must be paid.
Average Maturity: This allows the Debt/Credit breakdowns to be listed according to the average maturity. The average maturity comes depending on the XML in the filter field. If there is no Average Maturity field in the filtering field;
Route: You should save the changes by specifying "Show Average Maturity? -Yes-" on the screen you will reach by following the steps of Dashboard > System > Page Settings.
Late Payment Interest: Allows Debt/Credit breakdowns to be listed by Late Payment Interest. Represents the maturity that will be used as a basis for the calculation of interest according to the Late Payment Interest of the Debt/Credit breakdowns.
How is Late Payment Interest Calculated?
1. The difference is found by subtracting the transaction date from the due date of all transactions (all Debt and Receivables) in the Account Statement.
2. The differences found are multiplied by the amounts on a line basis (Debt or credit amounts)
3. All of these transactions are aggregated.
4. The amount in the second item is divided by the amount in the third item to get the Late Payment Interest.
Member Categories: It allows you to view the results by grouping them on the basis of the member categories you choose. In order for you to make a selection in this field, the relevant categories must be defined. For this;
Route: You can add a new member category or update an existing one by following the steps of Route: Dashboard > System > Parameters > ERP. There are three main member categories in W3: Contacts, Accounts, and Employees.
Execution for Debt: By using the done/not done filter, you can follow the debt/credit status of the current account holders for the enforcement proceedings you have selected. You can define your executive members or update your existing members from the page you can access by following the Route: ERP > Finance - Accounting > Risk & Assurance > Execution Proceedings steps.
Sorting: This allows you to sort results alphabetically, ascending/descending by balance, or by category.
Country: This allows you to view the results by members in the country you entered. Represents the country where the current transaction was created.
Province: This allows you to view the results according to the members in the city you entered. Represents the city where the current transaction was created.
Sales Region: This allows you to view the results according to the members in a certain sales region. It represents in which sales region the current transaction was created. (Marmara region, Mediterranean region etc.)
Collection/Payment Type: This allows you to view the results according to the Collection/Payment Method you performed the current transaction.
Transaction Date: This allows you to view the current accounts that were traded in the date ranges you selected.
Maturity Date: This allows you to view your maturity-based results in the date ranges you select.
Type of Relationship: This allows you to view the results according to the type of relationship with the members.
Customer Value: This field allows you to search based on the customer value you selected. It represents the value that the seller has determined for his customer. Customer value varies according to the structure of the companies. Customer Value definitions must be made beforehand in order to make a selection in this field. For this;
Route: You can define it from the page you access by following the steps Dashboard > System > Parameters > Add Customer Value.
Buyer/Seller: Filters the results according to the buyer/seller status specified during the registration stages of the members.
Debits/Credits: This allows you to view the results as Debtor Members/credit members.
3- List
Current account code, Accounting Code, Current Account, Debit, Receivable Balance information is displayed in the list columns as standard.
You can edit columns with Page Designer.
Select/Deselect All: You can select or deselect all records by selecting the top box.
You can get a batch printout of the lines you have marked with the "Print" icon just above it.
By using another Workcube "Batch Print" icon on the left, you can print out all the listed records.

2. Select: After selecting the boxes next to the records you want to print, you can print the selected records with the print button at the top of the boxes.
3. Print Record: You can print out the relevant record with the print icon on the right side of each Debt/Credit Breakdown record.
In the "USD Balance" field displayed on the listing screen;
A: Current account is "Receivable",
B: Represents that the current account is in "Debtor" status.
4- List Export Feature
By clicking the buttons on the list, you can save the list result by converting it to different formats.
Create Excel: You can save Debt/Credit Breakdowns in excel format to your computer.
Create Word: You can save Debt/Credit Breakdowns in Word format to your computer.
Create PDF: You can download Debt/Credit Breakdowns in PDF form.
Send E-mail: You can send the Debt/Credit Breakdown by e-mail.
Print: You can print the Debt/Credit Breakdown page according to the defined print template.
5- General Total
In Debt/Credit Breakdown, the debt/credit totals of that page are displayed at the bottom of each page.
With these buttons, you can switch between pages on the listing screen.
Indicates the total number of records existing in the relevant criteria and which registration page you are currently on.
6- List Navigation
You can navigate between the pages under the list by using the back and forth buttons.