Installments Sales
In Workcube, you can quickly and easily manage your installment sales transactions to your contacts and accounts. Installment Sales; It works integrated with ERP, CRM, PMS, PAM, and other Workcube modules.
Route: ERP > Sales-Distribution > Sales > Installment Sales
It is possible to choose the payment methods of the total shopping amount made by the customer in cash, by credit card or in installments. With functions such as customer installment payment performance tracking and installment reminder, collections can be tracked effectively. You can divide the purchases made in installments into an unlimited number of installments. If it is a new customer with installment sales, you can instantly add it to the system as a member. You can see the customer's risk information and limit exceeding while recording the order, and add a guarantor to the customer.
You can create an installment sale over an existing offer, or you can add a new installment sale information. For this, click on the Installment Sales link in the bottom module of the sales screen and click on the “+” icon on the installment sales screen.

The “Installments Sales” screen will appear.
This screen consists of 4 parts;
- Customer Information
- Order
- Payment
- Guarantor and Risk
Customer Information
On this screen, you can specify general information about the customer. If you wish, you can select an existing contact/account by clicking the three-dot icon in the Name-Surname field and continue your transaction from the "Order" section, or you can manually enter all the information and click the "Save Member" button to create a new contact/account customer.
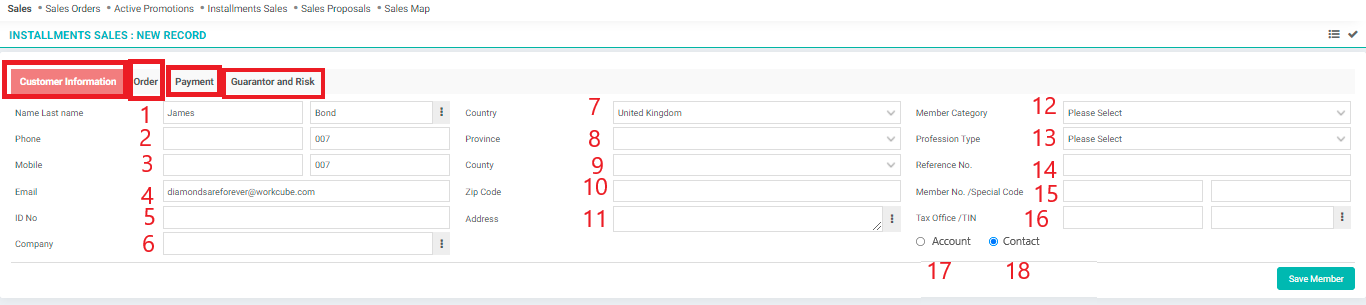
1-Name Last Name: Select the customer you will sell to from this field.
2-Phone: The fixed phone number defined in the contact/account of the customer you selected will be automatically displayed. If you want to enter a different number, you can delete the automatically received number and enter it manually.
3-Mobile: This number comes from the member details. You can also enter it manually if you wish. Mobile phone codes must be predefined. You can define mobile phone codes from the Dashboard > System > Parameters > Mobile Phone Codes screen.
4-E-mail: It will come automatically depending on the customer you choose.
5-ID No: It will come automatically depending on the customer you choose. If you want it to be mandatory, change the "Require Identity Number" field to "Yes" in the XML settings.
6-Company: You can specify the company you will sell in installments in this field. To select the company, click on the icon on the right side of this area and you can select the relevant member from the list of members.
7-Country: It will come automatically depending on the customer you choose. You can change it if you wish. The country must be defined in the parameters. To define country information, go to Dashboard > System > Parameters > Countries page.
8-Province: It will come automatically depending on the customer you choose. You can change it if you wish.
9-County: It will come automatically depending on the customer you choose. You can change it if you wish. Provinces and Counties must be defined in the parameters. To define it, go to Dashboard > System > Parameters > Provinces Counties page.
10- Zip Code: If it is defined in the contact/account details of the selected customer, it will be displayed automatically. If you want to type another zip code, you can delete the field and enter the zip code.
11-Address: The addresses of the selected customer will be listed in this field.
12-Member Category: Select the member category.
13-Profession Type: You can specify the type of profession from this field. Profession types must be defined in parameters beforehand. To define a profession type, go to Dashboard > System > Parameters > Profession Types screen.
Note: If you want to make the Profession Type field mandatory, select the "Require Profession Type" field as "Yes" from the Dashboard > Page Settings > XML settings.
14-Reference No: You can specify a reference number in this field.
15-Member No/Special Code: Member number will be automatically displayed in the Member No/Special Code field depending on the customer selected. If there is a special code, you can enter it in the box next to it. If you are registering a new customer, if you leave the number in the Member No field blank, the system will automatically assign a number.
16-Tax Office/TIN: This field comes from the details of the selected contact/account customer.
17-Account: If the customer you will register is an account customer, you should mark this field and make your definitions accordingly.
18-Contact: If the customer you are going to register is a contact, keep this mark selected.
After entering the necessary information, click the "Save Member" button if the person or institution you have made sales with is not registered.
Order
On this screen, you can specify general information about the order.
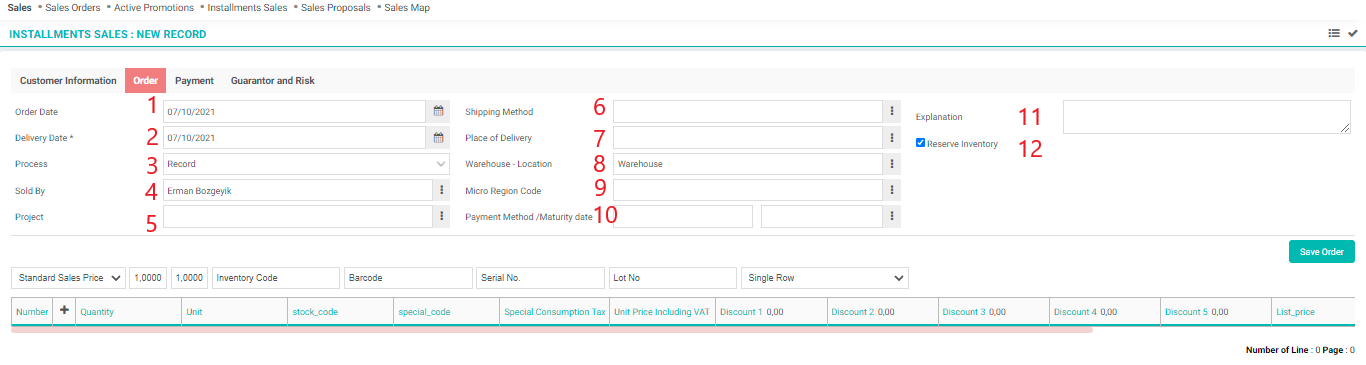
1-Order Date: This date will come as the registration date.
2-Delivery Date: The delivery date will come automatically depending on the registration date. You can select a different date by clicking the icon next to it. The delivery date will not be reflected in the product lines. If you want it to be reflected, select the "Reflect Delivery Date to Product Lines" field as "Yes" in the XML settings.
3-Process: Specify the process status for installment sales in this field. Processes may vary in each company. To define processes, go to Dashboard > BPM > Processes.
4-Sold By: The person who made the registration will come automatically. If you wish, you can select a different person with the help of the icon next to it.
5-Project: If you are making a project-based sale, you can select the project from this field. If you want the project field to be mandatory, select the "Require Project" field from the XML settings as "Yes". If you want the project to be reflected on the lines, select the "Project in the Document Project on the Lines" field as "Yes".
6-Shipping Method: Specify the shipping method of the products you sell in this field. Shipping methods must be defined beforehand. You can go to Dashboard>System>Parameters>Shipping Methods page to define shipping methods.
7-Place of Delivery: Select the place of delivery from this field. Delivery locations come from customer information.
8-Warehouse-Location: Select the warehouse and location where the products you have sold in installments are located. Warehouses and locations must be predefined. For detailed information, you can review the Warehouse and Space Management document.
9-Micro Region Code: Add the micro region code from this field.
10-Payment Method/Maturity Date: Select the payment method for installment sales in the Payment Method/Maturity Date field. Payment methods must be defined in the system beforehand. You can go to Dashboard>System>Parameters>Payment Methods page to define the payment method.
11-Explanation: You can specify explanation/detail information for installment sales in the explanation field.
12-Reserve Inventory: Tick this box to reserve the products you will sell in installments from the inventories you have.
Payment
Specify the down payment, installment, check, or promissory note information according to the payment method specified in this field (according to the payment method you specified in the first field).
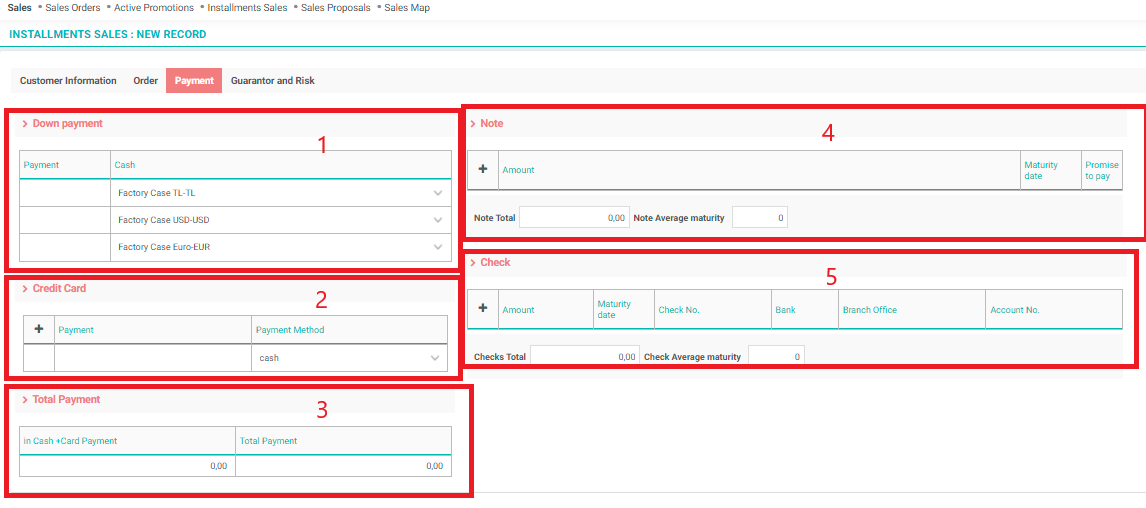
In section 1: you can specify the down payment information (if specified in the payment method). You can specify the down payment amount in the Payment column. In the Cash column, specify in which cash this down payment will be entered (according to the currency).
In section 2: if the down payment is in partial form, it should be stated in the next section which amount will be paid and how.
In section 3: in cash + card payment and total payment are displayed here.
In section 4: the information of the payments to be made with the promissory note should be entered. If you want automatic billing calculation, select "Allow Automatic Bill Calculation" option as "Yes" in XML settings.
In section 5: it is used for the checks to be used in the payment process in the checks field.
Note: In order for the check and note debtor information to come from the current account automatically, select the "Get Check and Note Debtor Information from Current Account" option as "Yes" in the XML settings.
If you want to define Guarantor and Risk, you can proceed to the next area. If you do not want to define it, you can click the "Save Order" button and create a record of your sales in installments.
Guarantor and Risk
This is the field where you can specify the guarantor limit for the person or institution. To add guarantor information, click on the dark line icon in this area. A line will be added where you can specify guarantor information.
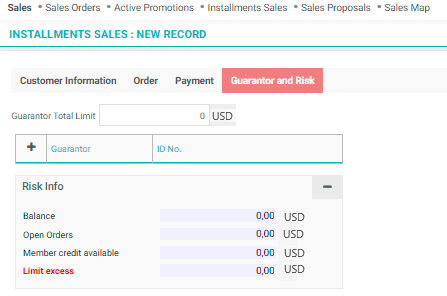
Click on the “+” icon to indicate the guarantor on this line and click on the three-dot icon next to the “Guarantor” field on the line that comes up, click on the relevant member from the members screen that opens.
The member will be added to the row. In the column to the right of this column, ID no will be displayed. In cases where it is not displayed, you can specify the ID no in this field.
In the bottom line of the guarantor information, the debit and credit information of this guarantor (if registered in the system) is displayed. In this way, information about the amount of collection that can be made in case of applying to a guarantor is obtained. In cases where it is not displayed, you can specify debit and credit information in these fields.
In the "Risk Info" field at the bottom, risk information is displayed according to the previous shopping transactions with the member.
After completing the necessary information, you can create your installment sale by clicking the "Save Order" button.
Tip: Do not forget to check the XML settings in Dashboard > System > Page Settings to view the settings such as displaying the branch office information, displaying the member category, displaying the micro region code and making the changes you want.
Installment Sale Update
To update the installment sales order you have registered, click on the number, subject heading, or icon of the related order on the installment orders screen. The “Installment Sale Update” screen will appear.

On this screen, you can change/update the information you want and click the "Update" button.
In addition, you can do the following with the icons in the upper right corner of the update screen;
Issue Invoice: You can issue an invoice on the installment order you have registered.
Account Details: You can view general information about the account by clicking this button.
Account Detail: Click this button to view the detail information of the account you are selling in installments. Account update screen will appear.
Risk and Working Conditions Details: When you click this button, risk and working conditions details about the account are displayed.
Sales Cancellation: Click the "Sales Cancellation" button on the installment order update screen to cancel the installment order process.
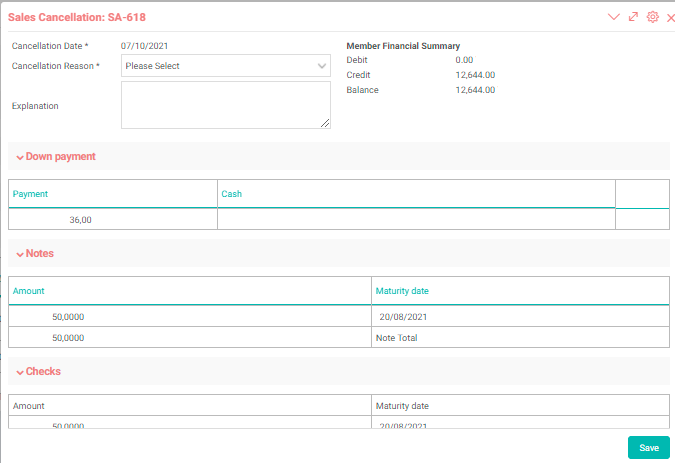
- On this screen, the date you are in is automatically displayed in the cancellation date field.
- Specify the reason for the cancellation of your order.
- You can specify explanation/detail information about order cancellation.
Accounting Receipt: See the details of accounting receipt.
Account Statement: You can view the current account statement of the member by clicking this button. The “Current Account Statement” screen will appear. The necessary selections are made on the screen that opens, and the "Run" button is pressed and the statement is displayed.
The following operations can be performed with the help of the icons on the displayed statement screen;
- You can request payment.
- You can place a payment order.
- You can review company details.
- You can print the statement, save it, save it as a pdf and send it via mail.
Sales History: Click this button to see the updates you have made on the installment sales screen. You will see a history of all the updates you have made before.
Notifications: By clicking this button, you can view the notifications about the installment order.
Follow Ups: Click this button to add tracking information about your installment sales order. You will see the Follow Ups screen where you can add tracking information and documents.
Detail / Order Fill Rate Report: By clicking this button, the purchase orders, related offers, issued invoices, and delivery notes, sales orders related to the products/services in the installment order record can be displayed. Thus, you can access information about the order amount.
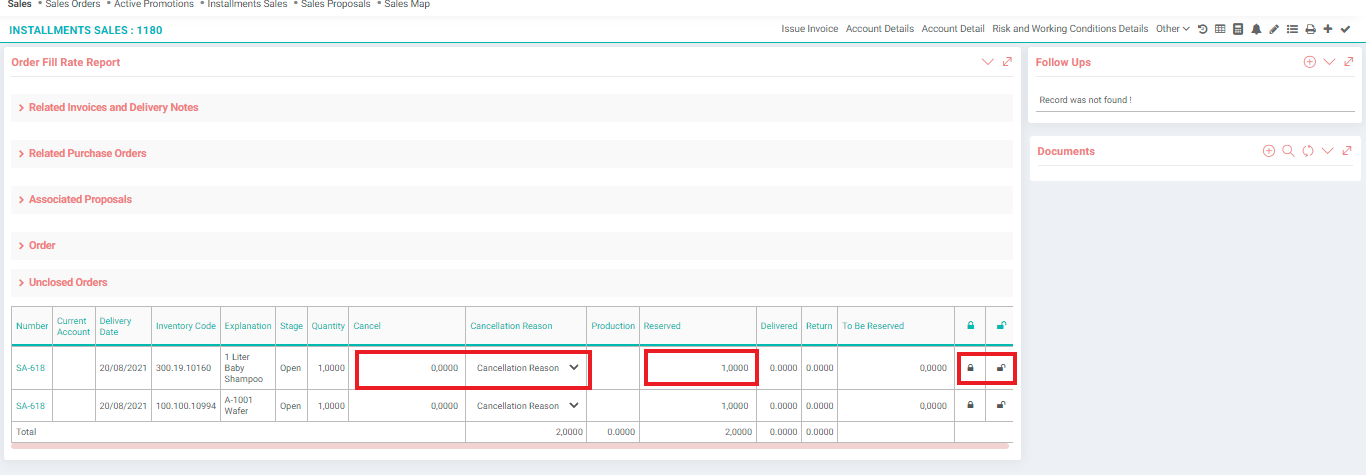
You can also cancel the order on this screen. For this;
- In the Cancel field, type the amount of the product/service to be canceled.
- In the Cancellation reason field, specify the reason for the return. The reasons for cancellation must be defined. To define the reason for cancellation, go to Dashboard>System>Parameters>Purchases - Sales Cancel Categories screen.
- You can make a reservation for the products/services included in the order. For this, specify the amount information in the "Reserved" field and click on the "Lock" icon on the right side of this field. In the same way, click on the icon next to the lock icon to cancel the reservation for the product.
After specifying the required information, click the “Save” button.
Searching in the Installment Sales List
On the Installment Sales page, you can search for offers by entering the value or values in the filtering field. If the "More" button is clicked, detailed filtering options are available.
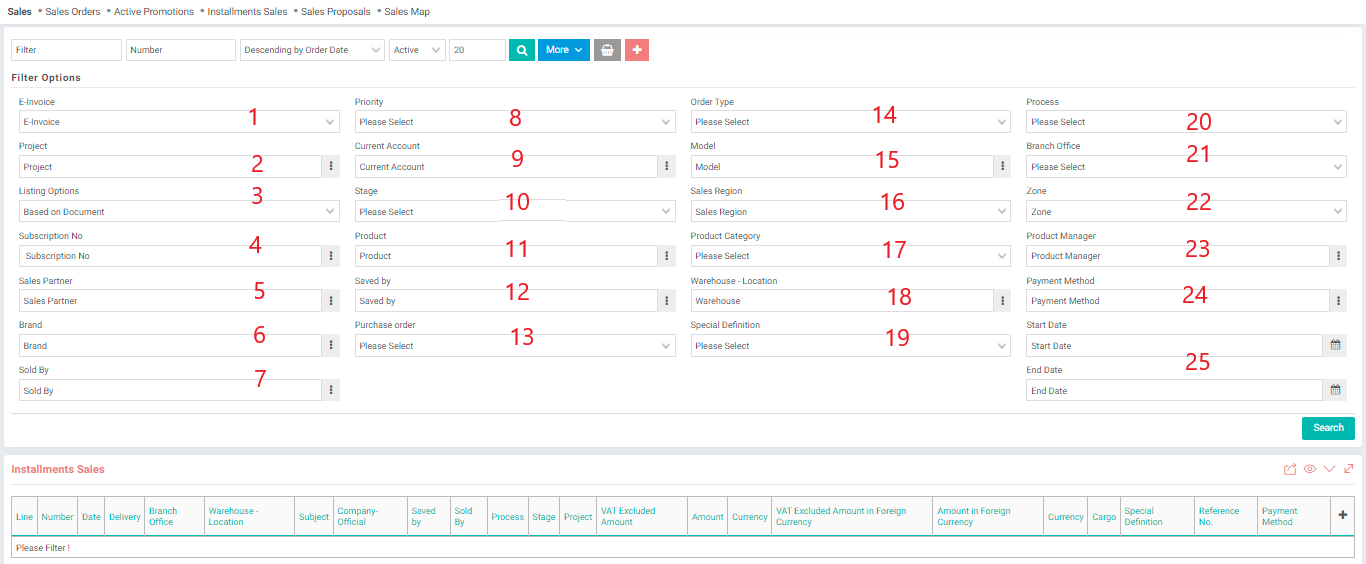
1-E-Invoice: It determines whether the customer in the order uses e-invoice or not.
2-Project: Allows you to search according to the associated project during registration.
3-Listing Options: Allows you to search for installment sales records or product lines in the record.
4-Subscription No: If the order is associated with a subscription, it allows you to search by subscription number.
5-Sales Partner: Allows you to search according to the sales partner specified in the order record.
6-Brand: Allows you to search by the brand of the product selected in the order record.
7-Sold By: Allows you to search by the sales employee specified in the order record.
8-Priority: Allows viewing installment orders according to their priorities.
9-Current Account: Allows you to search according to the current account selected in the order record.
10-Stage: It allows to display orders according to line stages.
11-Product: Allows you to search according to the product selected in the order record.
12-Saved by: Allows you to search by the user who registered the order.
13-Purchase Order: Allows you to search with a purchase order if it is associated with it.
14-Order Type: Allows you to search according to the selected order type.
15-Model: Allows you to search according to the model of the product selected in the order record.
16-Sales Region: It allows to search according to the sales region specified in the order.
17-Product Category: Allows viewing installment orders by product category.
18-Warehouse-Location: Allows searching by delivery location
19-Special Definition: This allows you to search according to the special definition selected in the installment order record.
20-Process: Allows you to search according to the process specified in the order record.
21-Branch Office: Allows searching by the branch office specified for the check in the installment sales record.
22-Zone: Allows to search by region
23-Product Manager: Allows you to search according to the product manager for the selected product in the order record.
24-Payment Method: Allows you to search according to the payment method specified in the order record.
25-Date: This allows you to search according to the order date selected in the order record.