Timekeeping Transactions
Leaves

- Category: It refers to the field where the leave types defined in the leave and excuse categories are displayed.
- Upper Category: It means collecting the leave types defined in the category under one category.
- Subject: Indicates the name of the leave type in categories.
- E-Declaration Equivalent: It refers to the equivalent of the relevant leave in the Tax Statement/Declaration.
- Category Content Settings: Indicates the area where the settings related to the defined leave will be made.
- Maximum Leave Type: It states that the relevant leave will be processed by selecting the day, month, and year.
- Expires in: It refers to the field where the duration of the defined leave is written.
Warning: In timekeeping transactions, if the employee does not have any leave records registered in the system in the relevant month, this employee is considered to have worked for 30 days (full month) by the system. In order to reduce the number of days in the payroll of the employee, leave must be entered into the system. The definition of the entered permission category in the parameters must not be marked as "Paid".
Add Leave
If the employees do not request leave through Self-Service transactions and this process is carried out manually by the HR Unit, a leave record must be entered by clicking + on the HR > Personnel - Payroll > Payroll and Timekeeping > Leave page.
Leave Category, Start, and End Dates are important when entering a leave record.
The approval process will not work for the leave records entered in this field.

- Don't Display in Timekeeping: The relevant check box indicates that the defined leave is not processed in the payroll and only the relevant leave is shown in the leave definitions.
- Employee: Leave definition refers to the selection of the employee to be made.
- Process: It refers to the process that should be selected for reflection on timekeeping.
- Category: It refers to the selection of the leave category to be defined for the employee.
- Start: It refers to the selection of the start date of the leave to be defined for the employee.
- Finish: It refers to the selection of the expiry date of the leave defined for the employee.
- Employment Start: It refers to the field where the date the employee will start work after returning from leave is selected.
- Information Fields: Refers to the address, telephone number, and fields that the employee will go to during the time he/she is on leave and the fields where the explanation will be written when requested.
- Document: It refers to the document upload field in the leave definitions.
Warning: Leaves without HR approval on the HR > Payroll and Timekeeping > Leaves listing page are not taken into account in timekeeping calculations.
Warning 2: The check box that does not appear in the timekeeping should be selected if the relevant leave is not required to be processed in the timekeeping record.
For Example: The second leave that appears below will not appear in the timekeeping.

Overtime
You can make overtime entries for your employees via the Overtime Work field. You can also list the entered overtime hours by filtering.
Route: Attendance and Control > Overtime

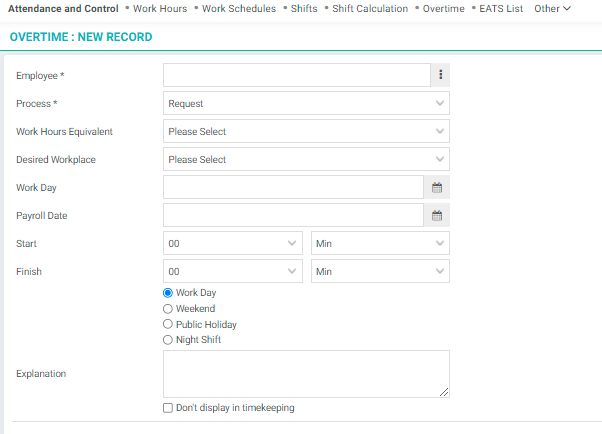
When we made the selection of the fields we want to record overtime, we saw the relevant data on the screen. Now let's look at the image where we can extract the fields for which "Overtime Work" data is to be taken, according to the selected options.
The ways to be followed during the overtime registration phase;
- If the option to be displayed in the timekeeping is selected, no calculation is made in the payroll related to the relevant overtime record.
- Selected for overtime.
- After selecting the employee and the overtime date, the start and end times of the overtime are selected.
- The category of overtime is selected. (Work Day, Weekend, Public Holiday, Night Shift)
Batch Overtime
Overtime can be entered for a single employee or batch overtime entry can be made.
The screenshot below shows that:
- In this field, it is selected which branch office and department employees will be entered for overtime, and
- Overtime is recorded in equal hours for everyone.

- Branch Office/Department: Indicates the area in which the branch office and department to which the overtime entry will be made is selected.
- Batch-Add: The change to be made in the fields in this line brings the same data for all employees in the branch.
- Employee-Based Regulation: The regulation in this field refers to the person-based regulation apart from the collective regulation.
Attention: In order to enter the batch overtime screen, it is possible to enter the relevant screen from the calendar icon on the overtime screen.

Additional Allowance - Adding Deduction
Additional allowances and deductions, which have been defined before, can be added to the employees individually as well as collectively.
Individual Definition: A selection must be made from the Additional Allowances and Deductions field in the upper right corner of the salary card of the employee to whom you will add additional allowance or deduction.


In the screenshots above:
- When you want to add additional allowance, the additional allowances you have made before, if any, will be listed.
- When you click the + in the left corner of the page that opens, the Additional Allowance Types that you have defined before will be listed. You can define the employee by selecting the additional allowance you want to add (the start/end dates and amount field can be updated if necessary).
- When you want to add a deduction, the deductions you have made before, if any, will be listed.
- When you click the + in the left corner of the page that opens, the Deduction Types you have defined before will be listed. You can define the deduction you want to add to the employee by selecting the deduction (start/end dates and amount field can be updated if necessary).
Batch Definition: You can access the batch definition screen via Additional Allowances. Click "Run" to list.

Batch Definition: You can reach the batch definition screen via deductions.
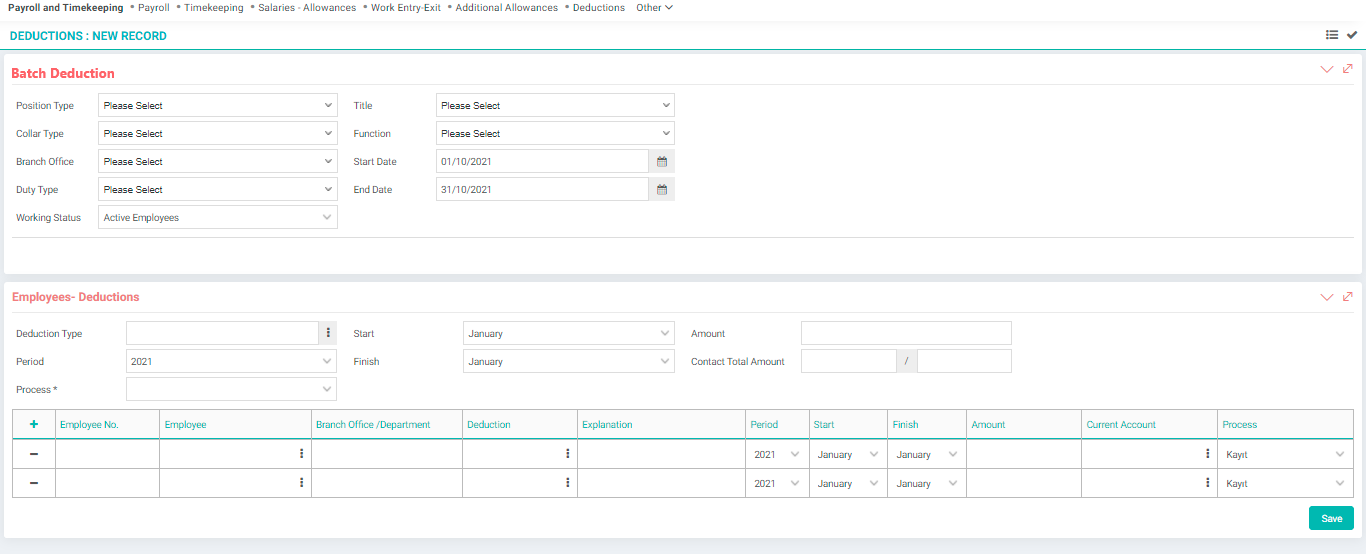
When creating a new record, you can get the list of personnel you want from the filtering fields in the upper area and add additional allowances/deductions to all of these personnel at the same time by selecting the Allowance type field. The selections above the area where the employees are listed have been arranged to affect the records of all personnel.
AES – Private Person
The defined Private Pension transaction can be made individually from the employee's salary card, or it can be added to the salary cards collectively.
Individual Definition: The months for selection and deduction must be selected from the Automatic IPS Definitions field under the Other option found on the salary card of the employee you will include in the Private Pension System.

Batch Definition: Payroll and Timekeeping > Individual Pension System - Automation is the field where batch definitions are made.

Employees that you will include in the system from the filtering fields at the top are filtered and come to the list below. When the Type of IPS (Individual Pension System), Period, Start and End dates are selected, the same rate of IPS is defined for all employees on the list.
Warning: The expiry date of the IPS deduction, which was previously defined on the salary cards of the employees who will leave the private pension system, should be updated.
Executions
More than one execution file can be defined to the system for the employee from the Payroll and Timekeeping > Executions Deductions area. The listing screen appears.

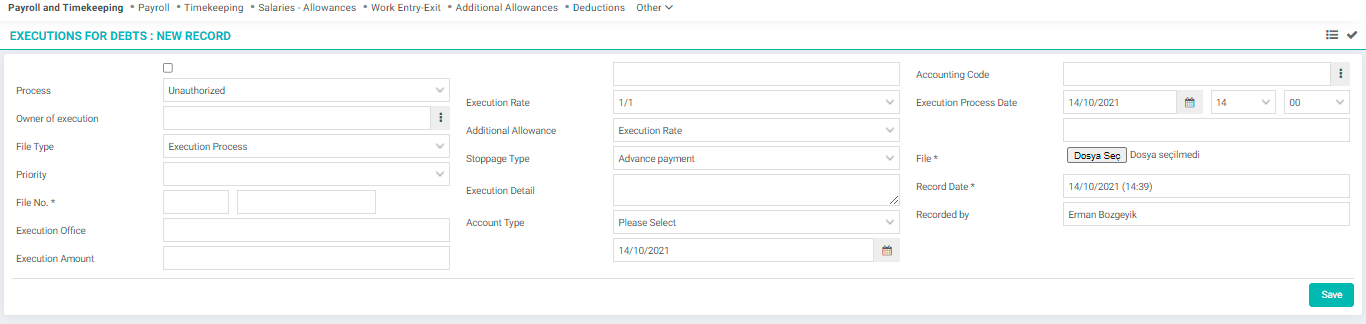
When we made the selection of the fields that we want to receive the data entered into the system during the registration phase, we saw the relevant data on the screen. Now, when we want to see the data entered in "Executions", we can look at the list of executions.
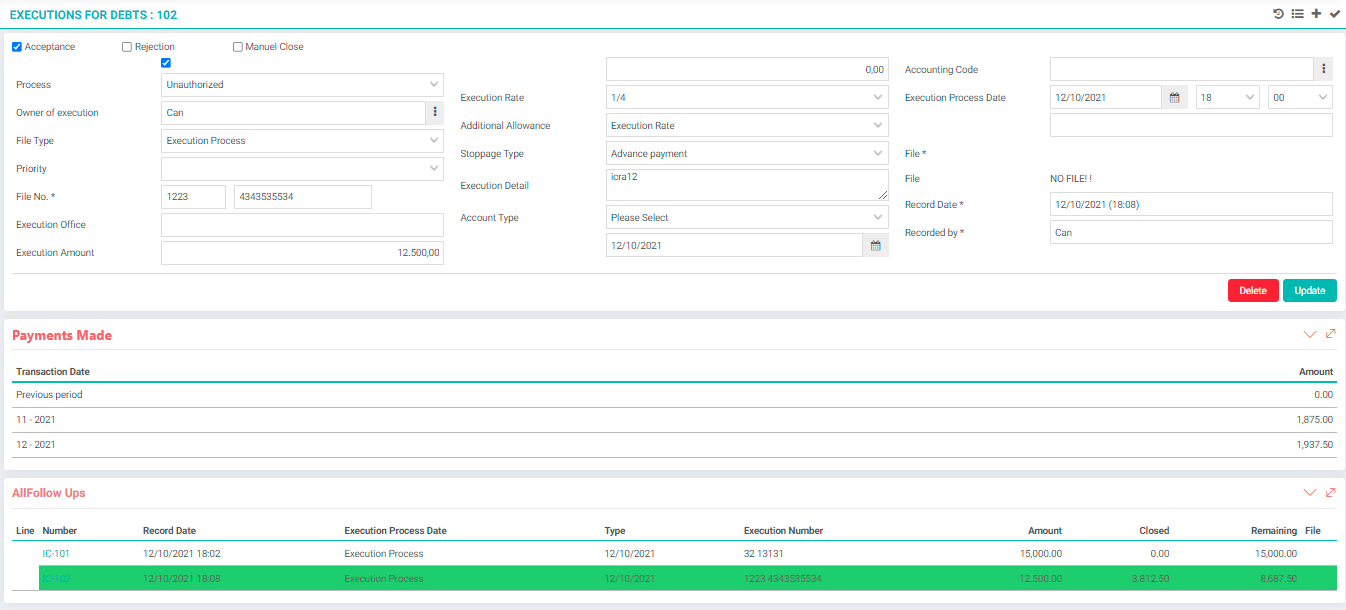
When the timekeeping is created, the calculated amount is recorded in the field below the definition of the relevant file. It is shown how much has been deducted from this area as of the first month. The deduction continues for this file until the total debt entered in the definition is exhausted.
When the total debt amount is finished, the system will start to make deductions for the file with the next priority.