5.4. Subscription Registration and Contract
Workcube Subscription Management ensures that business processes are accelerated and information is managed in the most effective way in order to produce fast and effective solutions to customer needs.
In order to register subscribers to the system, the subscribed product or service must first be registered in Workcube, and the relevant parameters must be defined in the system. The subscriber must be registered in the system as a Contact or an Account.
Before defining your subscribers to the system, you must have made your parametric settings.
ROUTE: Subscription Management > Subscribers
While registering subscription, the screen consists of 3 parts. General information is recorded in the first section, address information is recorded in the second section, and the Subscription Product Plan is recorded in the third section.
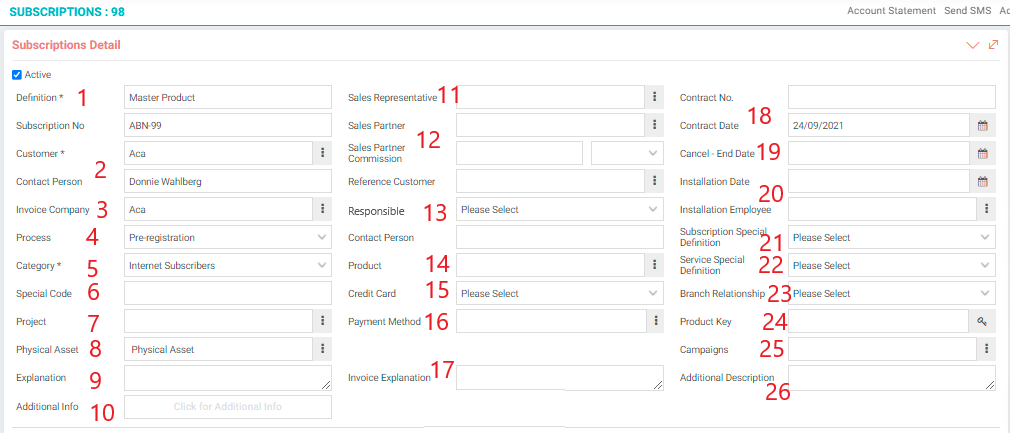
- Definition-Subscription No: Subscription subject is entered. You can also enter the short name of the Subscription you have created. The subscription number is automatically assigned by the system.
- Customer and Contact Person: The Current to have a subscription registration is selected, the Contact Person field will automatically appear depending on the selected current.
- Invoice Company: Select the Current from which the invoice will be issued. There may be more than one subscription belonging to the same Current. You can only issue a single current whose invoice you have determined here by group invoicing.
- Process: The process of subscription registration is determined. Processes vary by company.
- Category: Subscription category is selected.
- Special Code: If there is a valid special code with the subscriber, it is defined in this field.
- Project: If the subscription is associated with a project, the project is selected from this field. In this way, the project will come automatically when opening a task record of the Subscription or issuing an invoice.
- Physical Asset: If the subscription is associated with a physical asset, the physical asset is selected from this field.
- Explanation: Enter the explanation about the subscription.
- Additional Info: If you need a field other than the definitions on the subscription-related page, you can use the Additional Info field.
- Sales Representative: The sales representative of the defined product is selected.
- Sales Partner and Sales Partner Commission: If there is a Sales Partner, it is determined from this field and the commission value of the Sales Partner is entered.
- If the Subscription came with a reference in the Reference Customer and Responsible field, the relevant reference is selected. It will come automatically according to the current selected in the contact person area. In the Reference Status field, you can specify from this field if the Subscription came through a reference.
- Product: The product subject to subscription is selected. The product definition kept in the system is for informational purposes only and is not used in transactions such as invoicing.
- Credit Card: Active credit cards defined in Current, selected in the subscription, are listed here. The credit card to be used is selected and if provisioning is to be made, this is done over the card information. It is not correct to change the card information for a system that has been sent to provision.
- Payment Method: The payment method to be used is selected.
- Invoice Explanation: If there is an explanation that you want to appear on the invoices related to this subscription in Batch Invoicing transactions, you can define it from the Invoice Explanation field. The explanation you add here is automatically added to the explanation section on the invoice screen. If it is blank, a statement indicating which month's invoice is written in the explanation field of the invoices.
- Contract No and Contract Date: In this field, the number of the contract made with the Subscription is entered. In the Date field, you can specify the date of the lean contract.
- Cancel - End Date: Subscription Cancel - End Date is defined in this field.
- Installation Date and Installation Employee: The installation date of the product is determined from this field. You can select the employee who is in charge of the installation.
- Subscriber Special Definition: From this field, you can select the special definition that you have defined in the parameters in accordance with your business.
- Service Special Definition: Service special definitions are selected from this field.
- Branch Relationship: The subscriber from this field is associated with a branch office.
- Product Key: Enter the product key detail.
- Campaigns: If the subscriber is associated with a campaign, the campaign is selected from this field.
- Additional Description: From this field, you can define the subscriber-related Additional Descriptions.
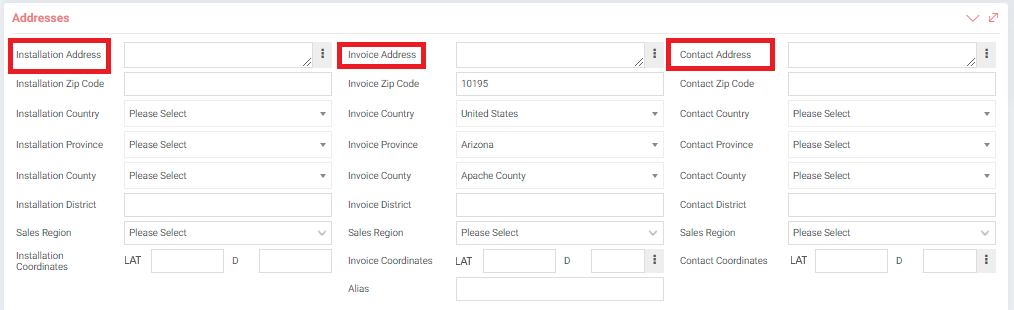
- The addresses field consists of 3 parts; Installation Address, Invoice Address, Contact Address. These addresses can be different or exactly the same.
- Coordinates are company coordinates defined in your subscriber's Account detail. If the coordinates are not defined when the Account during the creation phase, this field remains blank.
- Alias Code If it is desired to issue invoices to different branch offices in e-Invoice, the alias code is entered by opening a branch office in Current Detail. If the current account uses more than one alias and the alias code is not defined in the invoice address field, it will not send the invoice by giving the warning that the alias definition is missing for this current account when making batch invoicing.

The Subscription Product Plan page is the area where you define the product for the subscription and manage the price and quantity of the product you define. You can add products, remove existing products or edit them.
TIP: When registering the subscription, the Choose a Product warning is for the Product Plan, not the product in the subscription detail.
Subscription Details
From the Service Definitions section, you can determine the support days and hours, and define the intervention and solution times. The definitions made here work in integration with Workcube's Service Application and Call Center Applications modules.
The Intervention Time is followed from the Service Application detail and calculated according to the Service Definitions. According to the definitions made here, you can also measure whether your service and call center employees return to customers within defined periods.

If there is an additional definition to be added regarding the subscription registration, you can enter it in the Additional Definitions section.

You can check the Offer, Installation, and Shipping status of the product from the Offer-Installation-Shipping Status section.

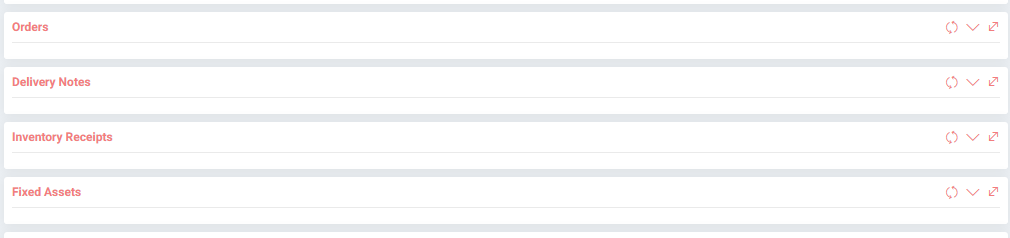
You can check the subscriber's product orders in the Orders section.
Delivery Notes-Inventory Receipts-Fixed Assets transactions related to the subscriber are listed and their details can be accessed.
For example; If you are providing security service, you can view the alarm boxes you have provided with the service via Fixed Assets.
The relationship with different subscribers can be defined in the Subscriber Relationship section. For example; You can associate subscriptions of the same company in different locations or for different products or services of the same company.

With the help of the fields on the right of the page, you can do the following;
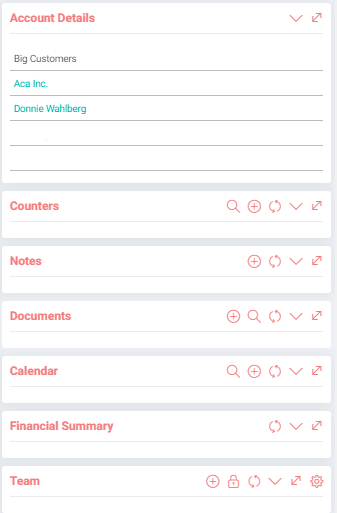
- You can check account details,
- You can determine the team of your subscription process,
- You can view the financial summary of the account,
- You can add a counter. For example; If it's a subscriber receiving electricity service, it can add an Electricity Counter in the counters,
- You can add a note about the subscription,
- You can add a document related to the subscription or associate it with an existing document,
- You can also add an event to the calendar and associate it with the subscription from the Related Events section.
You can do the following with the help of the links at the top right of the subscription details;
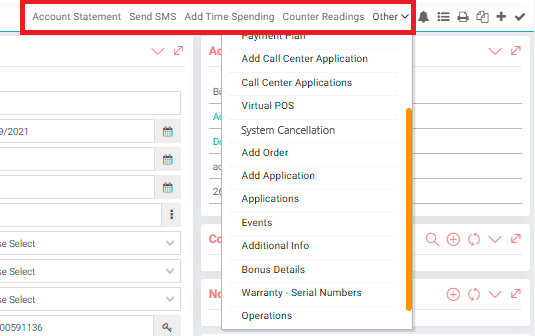
- Add Time Spending: If you enter time spending: assigns time spending record to current, subscriber, and project in the application. In this way, you can see the time spent for the customer.
- Counter Readings: If a counter has been added to the subscriber, you can view the last values of the counter, etc., from this field.
- Add Additional Page: Definition is made from the page types in the parameters. The template is created and comes automatically.
- Payment List: The list of the payment plan you created appears. You can review the paid and unpaid invoices from this list.
- Payment Plan: You can create a payment plan for the subscription from this page. For detailed information about the Payment Plan, you can review the Subscription Service and Pricing (Payment Plan) document.
- Add Call Center Application: This page directs you to the Call Center Applications new registration page.
- Call Center Applications: This page takes you to the Call Center Applications listing page. For detailed information, you can review the Call Center Applications document.
- Virtual POS: Automatic Virtual POS is designed to collect customer invoices from credit cards in companies working with a subscription system.
- System Cancellation: You can cancel the subscription from this page.
- Add Order: This page leads to the sales order creation page with Subscription and product information. Here you can create a sales order.
- Add Application: This page takes you to the Add Service Applications page.
- Applications: This page takes you to the Service Applications listing page. You can review the Service Applications document.
- Events: From this page, you can view the related events or go to the agenda screen to add events.
- Additional Info: You can check additional defined information on this page.
- Bonus Details: You can add or update the bonus value from this page.
- Warranty - Serial Numbers: This page directs you to the Serial and Lot Transactions page. You can create a separate serial number for the products in the product plan you have entered in the subscription.
- Operations: This page is the page where you can check all subscription-related information such as a delivery note, invoice, application.