TPD (Trade Promotions & Discounts)
Timed TPD related to products can be defined in the Workcube Product Management module. TPD management is used to make Trade Promotions & Discounts only on certain products in price lists.
Route: ERP > Sales & Distribution > Promotion Management > TPD (Trade Promotions & Discounts)
Conditioning date can be determined while planning TPD. In purchases made from the specified condition date to the TPD end date, the TPD discounts determined for the products included in the TPD are applied to the product prices in the purchase orders.
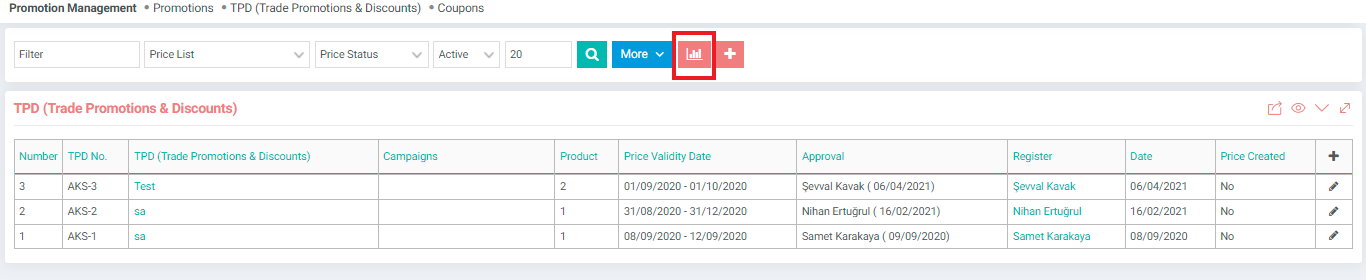
You can access the Product Trade Promotions & Discounts Report from the marked icon.
Click on the “+” icon on the TPD page.
“TPD (TRADE PROMOTIONS & DISCOUNTS): NEW RECORD” screen will appear.
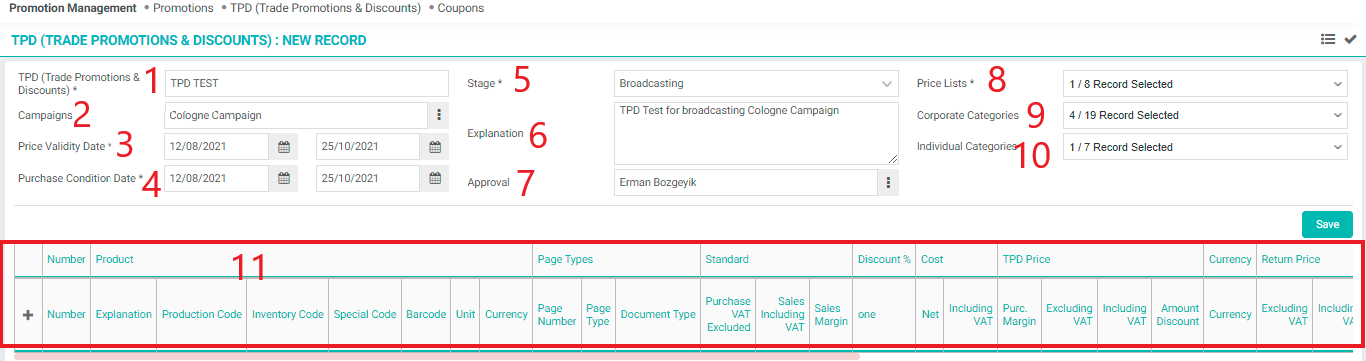
1-TPD (Trade Promotions & Discounts): Type the name of the TPD you registered in the TPD field.
2-Campaigns: Click on the icon next to this field to select the campaign that the campaign field TPD is associated with. The Campaigns screen will appear. Select the relevant campaign from this field. eg. Halloween campaign.
Note: The names of active campaigns defined in the campaign module are listed here. You can go to CRM > Sales and Marketing > Marketing screen to define a campaign.
3-Price Validity Date: Select the start and end dates of the TPD by using the icons next to this field.
TPD prices remain valid in the relevant lists during this selected period. At the end of the period, the list prices of the relevant products will be restored.
4-Purchase Condition Date: The condition date allows to determine the purchase period for which TPD discounts will be valid, and is used to control the purchase of goods in accordance with the purchasing conditions for which TPD is entered, in the purchases of goods between two dates. It ensures that discounts are applied automatically to the goods receipts or invoices entered between two dates. Select the conditioning date by clicking the icon on the right of these fields.
The conditioning period is usually longer than the TPD period and begins before the TPD start date.
For purchases made from the specified condition date until the TPD end date, the TPD discounts determined for the products including the TPD are applied to the product purchase prices in the purchase orders.
Note: If you do not want to display the condition date, from the Page settings; "Show Condition Date?" Select the "No" field.
5-Stage: The stage field is used to select the stage where the planned TPD is located. TPD prices cannot be applied to the relevant lists until the TPDs that are in the preparation stage in the first registrations are brought to the Publication status.
6-Explanation: You can write an explanation about TPD in the Explanation field.
7-Approval: Click the icon on the right side of the approval area and select the person who will approve the TPD to be valid.
8-Price Lists: The Price Lists section on this page allows you to select in which lists the TPD prices of the products included in the TPD will be applied. TPD is applied for the relevant products only in the price lists with the box next to the marked.
9-Account Categories: You can select the members who will benefit from the TPD you registered in this area, according to the account category they are affiliated with. These categories are defined in System > Parameters > Account Categories.
10-Contact Categories: You can select the members who will benefit from the TPD you have registered in this area, according to their contact category. These categories are defined in System > Parameters > Contact Categories.
11-Basket; You can add the product/products that will see TPD in the basket template area with the help of the “+” icon. When you click on this icon, click on the link of the product you want to be included in the TPD from the products field. The product will be added to the basket template.
The following fields are available in the basket template;
- Product Field: In this field, information about the product will appear automatically.
- Page Types: You can select the relevant page number, the defined page type, and the defined document type (catalogue, insert, etc.) from the catalog page definitions you have defined in this field.
- Discount Field: You can define 10 different discounts in this field. If you see the number of discount definitions less than 10. Check the Page settings.
Important: The discount rates written here are net deducted from the standard purchase price. For products that have entered TPD, the discounts defined in the TPD detail are used, not the existing purchase agreements with the suppliers, during the TPD condition period. At the end of the TPD period, the product discounts in the purchase agreements are activated again.
- Cost: The information on the product registration screen is automatically displayed in the Cost field.
- TPD Price: It refers to the profit margin to be applied to the product purchase price during the TPD period. For each product in the product basket, write in these fields with what % profit margin you will sell the product during TPD.
TPD margin is applied to the purchase price with TPD discounts applied, and as a result, the TPD price of the product is automatically calculated by the system and displayed in the TPD Price column. The price to be applied to the price lists is the TPD price calculated here.
- Return Price: At the end of the TPD, the price applicable to the product is indicated.
- VAT: In this field, you can select the VAT rates, maturity type, and defined shelf type that will be valid for purchase and sale. If you don't want to see this line, select "Show Standard Purchase VAT Price on Line?" from Page settings. Mark the option as “No”.
- All Conditions: Conditions that you defined on the Product registration screen are displayed in this field. If you don't want to see this line, select "Show Conditions in Line?" from Page settings. Mark the option as “No”.
If there are areas that are not visible in the basket template or you do not want some settings to be visible, check the Page settings.
To Update TPD Information;
Click on the “Update” icon at the end of the relevant TPD line. The TPD Update page has a Number field and an Active tile in addition to the fields on the Planning page.
- TPD Number is automatically generated by the system.
- The active box is used to activate or deactivate the TPD. Active TPDs are displayed in the TPD list.
To see outdated passive TPD, you can deactivate the active area next to the filter area at the top of the TPD list and search.

You can do the following from the options at the top right of the update screen;
History: You can view the history of the updated information about TPD by clicking this icon.
Inventory Transactions in TPD Period: By clicking this icon, you can view the inventory transactions between TPD dates.
Official Reports: By clicking this icon, you can view the official reports of TPD.
On the page, the official reports of the TPD are listed together with the record date, register, communication method, the headline of the official reports, and the text of the official reports.
To add a new report; Click on the “+” icon at the top right of the official reports page. You will see the record add page.

Select the “Communication Method” defined for the official reports information.
Important: Communication methods listed in this field are defined in System > Parameters > Communication Methods. You can add from this field.
Specify the date information for the Official Report. You can use the icon on the right of this field to specify the date information. Specify the subject title for the Official Report. After making the necessary explanations, click the “Save” button.
To search the Official Reports list, use the blank space next to "Filter" at the top of the page. With the help of what is written in this field, it is possible to search among the Official Report titles.
Create Barcode File: Click on the barcode icon at the top right of the Official Report detail page to create a file containing the product barcodes included in the Official Report. Depending on your selection, the system will display the file or save it to your computer.
The barcode file contains the list of products included in the Official Report. Products are listed with barcode, quantity, and product name information, respectively.
Note:The created barcode file can be used in the Print Batch Barcode process.
Other;
All Related Prices: Click this button to apply the planned product TPD prices to the relevant lists.

On the screen that will appear, the price information in the lists to which the products included in the TPD will be applied to the TPD will be listed. From here, check the product TPD price information again and make sure it is correct.
Click the “Create Price” button to apply the prices to the lists.
TPD product prices in all price lists where TPD is valid will be changed and published as in the information screen.
Copy Company: Click the Other > Copy Company button to copy the TPD to a different company. The "Companies" page will appear. From the company names on this page, select the one you want to copy the TPD and click the “Copy” button.
TPD planning screen will appear. The product information of the TPD that we copied is transferred to the page by the system. The price lists of the relevant company are displayed on the left side of the page.
You can view “Notifications” via other icons, “List”, “Print” and “Copy” on TPD's page. You can “Add” and “Save” a new TPD.
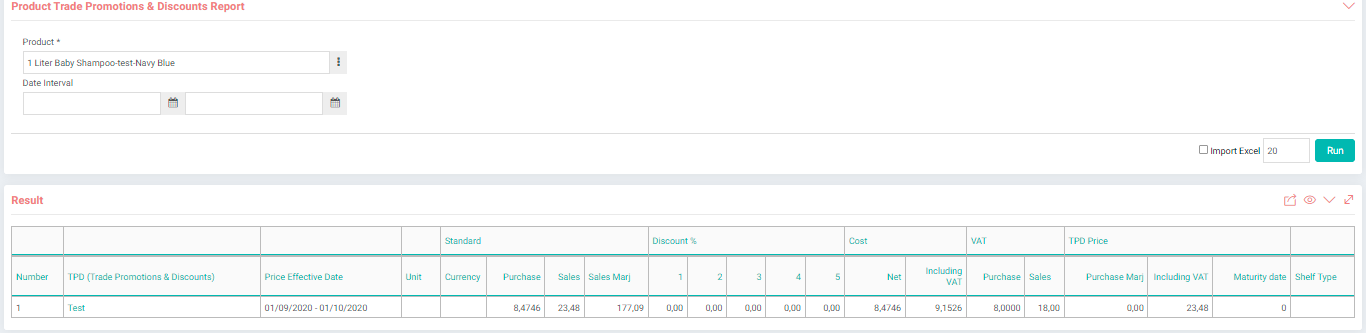
Product TPD Report
From the product TPD report, you can find answers to questions such as whether a product has taken TPD and what was the price when it entered TPD. You can access the Product TPD report from the Product Card, the TPD page or the ERP > Sales-Distribution > Products & Stocks page.
If you specify the product name or the date range and click the "Run" button, you will see a product TPD report.