Basket Settings and Usage
Main Workcube Screens Using Basket
- Purchase / Sales Invoices
- Purchase / Sale Orders
- Purchase/Sale and other Delivery Notes
- Sale / Purchase Offers
- Purchase Request
- Internal Requests
Basket Settings and Page Designer
There are certain columns in the baskets. These consist of fields such as the costs, codes, quantities, and quantities of the products/services you add. You can control the fields that you want to see or do not want to see in the basket and that you want to make mandatory by following the path below:
Route: System > Page Designer > Basket Layout
To enter Page Designer, click System > Page Designer on a screen where the basket is running. Click on the “Basket Layout” field on the screen that comes up. On the screen that opens, you will see the sections where you can edit the basket.
The first section is directly related to how the columns in the basket should be displayed on the relevant screen and how they should behave.
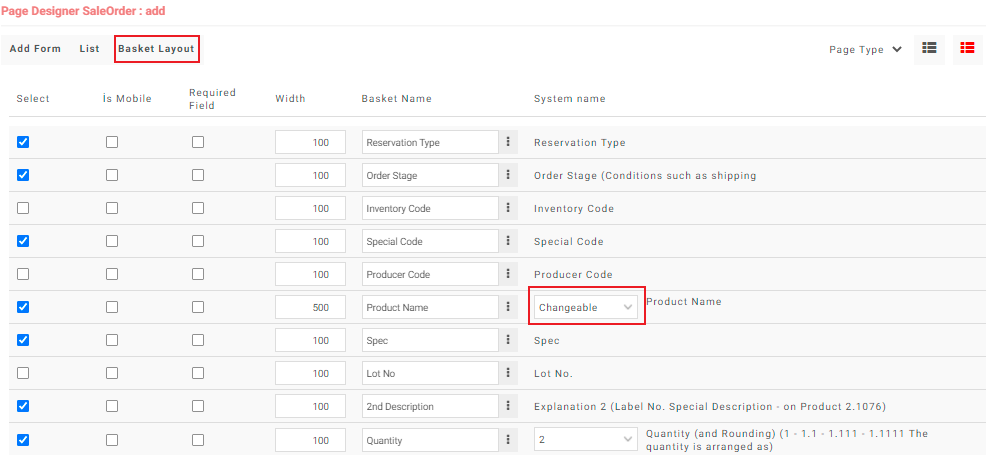
- You can uncheck the "Select" checkbox of the fields you do not want to display.
- If you want it to be displayed on mobile screens, you must tick the "Is Mobile" checkbox.
- You should tick the "Required Field" checkbox of the fields you want to be mandatory.
- The "Wide" field sets the width of the relevant column in the basket on the page. The numbers are written here refer to the character length.
- In the "Basket Name" field, you can make changes in which heading you want the relevant column to appear on the screen. For example, you can write Stock Number instead of Stock Code. When you click on the icon next to this field, you will see the screen where you can write the column name in different languages. When they switch to the interface in a different language, users display the basket columns according to the translations here.
- You can change the order of the columns by dragging the rows.
- You can make selections such as changeable/unchangeable in some fields.
Barcode Device

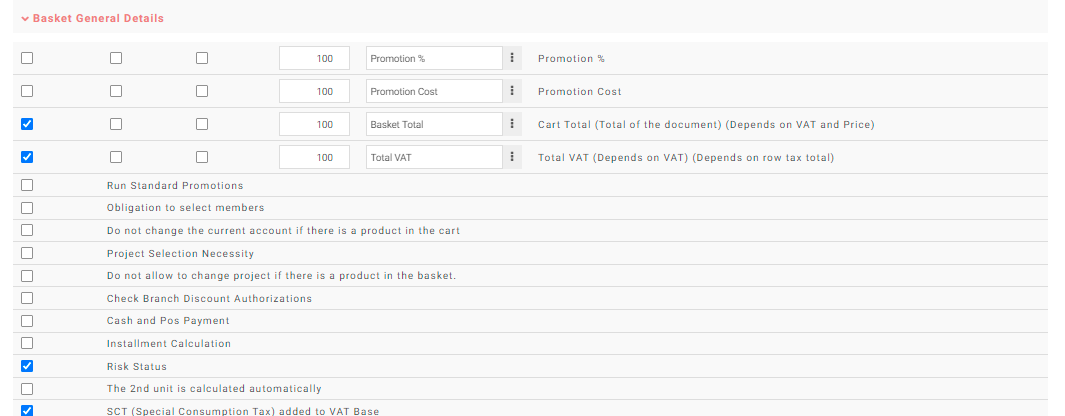
Basket General Details
This section is the section that directly affects the overall operation of the basket. If you want to see the amount of information in the field where the general information is located, the checkbox "Display the quantities in basket total." must be checked. Or, if you don't want to see the currency information, you should remove the "Display Foreign Currency Details in Basket Total" checkbox.
General Info
From this area, you can control the changes you want to make, such as the number of rows, rounding of numbers.
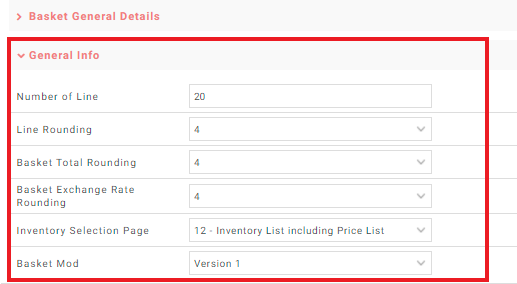
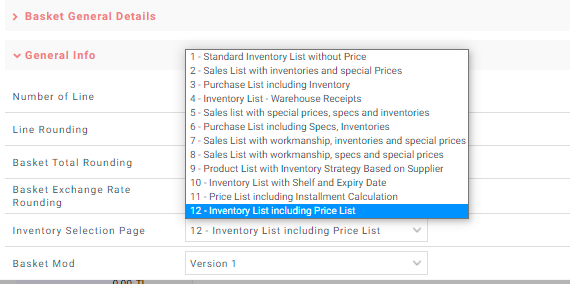
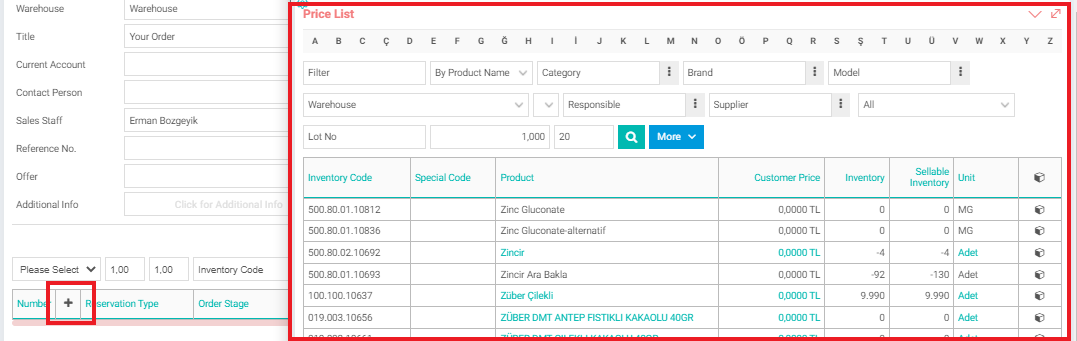
Inventory Selection Page: In the screens where Basket is used, the popup screen that we open when adding products/services to the basket is set in this area according to what product/service/stock listing should be made. For example, when using “Sales List with inventories and special Prices” for the invoice screen. For the basket area on the Internal Request screen, we can select the product from the popup screen where the "Standard Inventory List without Price" is displayed and transfer it to the Internal Request page.
Note: Don't forget to click the "Update" button after making the changes. Otherwise, your changes will not be saved.
Use of Basket Layout on Screens
After basket settings are made on a screen, the basket area will be displayed at the bottom of the screen on every new record or update screen related to functions containing baskets.
Adding Items to the Basket
From the search section on the popup screen, you can filter the products by serial number, lot number, barcode number, stock code and add them to the basket.
Warning: The settings of the product/service stock selection screens for the baskets are made from the Basket settings, and the popup screens where the product/stock code will be selected on the page are displayed according to this setting.
Note: Repeat the same process to add more than one product to the product basket. As soon as you select the relevant product and service on the popup screen, it is added to the basket area at the back. You can select and add multiple products without closing the pop-up screen.

: This icon at the end of the product name directs you to the product detail.
- You can add products to this field by scanning the barcode directly with the barcode scanner. For this, move the cursor to the specified area and scan the product barcodes with the barcode scanner.
- The added products are displayed on the screen with the header information in the basket.
- What this information will be on the detail page should be determined by the system administrator beforehand. The information that can be included in the product basket and its uses are as follows.
Note: All of the following titles may not be displayed on your screen. Please only consider the parts related to what is displayed on your screen.

- Stock Code: This information is displayed automatically by the system. It cannot be changed.
- Barcode: This information is automatically displayed by the system. This part should not be changed for products and/or services with barcodes.
- Producer Code: This information is displayed automatically by the system. Changing this part is not recommended.
- Product: Displays the product name. It is not recommended to replace this part unless necessary. When the icon in this column is clicked, the product information screen opens.
- Spec: Used for product spec identification. Product specs can be defined by clicking on the icons in the column. Information on this subject is explained in the Product Management section.
- Quantity: Indicates the quantity of the product or service. It must be entered manually.
- Unit: This information is automatically displayed by the system. It is gray in color and cannot be changed.
- VAT%: Displayed automatically by the system. It expresses the VAT rate to which the product is subject. Changing this part is not recommended. Product VAT rates are defined in the product details.
- Price: This column displays the product unit price. Clicking on the icons in the column opens the price detail screens for the products. By clicking on the prices here, different unit buying or selling prices of the product can be displayed on the basket.
- Currency Price: Displays the product unit price in the foreign currency selected in the lower section.
- Net Price: Displays the product unit net price with discount rates applied in the Discount columns.
- Foreign Currency Net Price: Displays the net price of the product in the foreign currency selected below.
- Due: Indicates the payment term. The number corresponding to the due date is entered manually
- Discount 1,2,3,4,5: Indicates the discount rates to be made over the unit price of the product. The entered number is perceived by the system as the % discount amount. Therefore, the number entered must be less than 100. 5 different product discount columns can be defined in the product basket.
- Row Total: Calculated automatically based on quantity and price. Indicates the non-discounted total. Changing this part is not recommended.
- Net Row Total: Calculated automatically according to the discount rates entered. Indicates the discounted row total. Changing this part is not recommended.
- Tax Total: It is calculated automatically over the amount and unit price according to the VAT rate of the product. Changing this part is not recommended.
- Final Total: It is the sum of Net Total and VAT Total. It is calculated automatically. Changing this part is not recommended.
- Currency: Used to display product exchange prices.
- Delivery Date: Indicates the delivery date of the product. Click the icon next to the field. Select the deadline from the calendar that will appear in front of you.
- Delivery Warehouse: It refers to the warehouse where the product will be delivered. Click the icon next to the field. Select the relevant warehouse from the screen that will appear.
- Order Stage: The stage of the order is selected from this field.
Product Removal
Click on the “-” sign at the beginning of the product line to remove the products you have added to the product basket.
You can also use the "Delete Products" button in the lower right corner of the grand totals area to delete all the products you have entered at the same time.
After you have finished adding or removing products, click the "Save" button at the top of the product basket.
Note: If you do not click the "SAVE" button or click the "Cancel" button or enter another page, the product information you add/remove or the changes you make will not be saved in the system.
If you click the "Delete" button, the detail page you are on will be completely deleted from the system.
Searching in Basket
On a page where a product/service has been added to the basket before, a search can be made in the basket area according to certain criteria.

- You can select the price list including the selected member from the "Select" field.
- You can set the amount from the "Quantity" field.
- The stock code of the product selected from the "Stock Code" field must be added. This field is required and the selected product must be included in the price list.
- You can add the barcode of the product to be added from the "Barcode" field. If you are not going to search by barcode, uncheck the "Barcode" checkbox from the "Page Designer" section as mentioned above.
- You can search by the serial number of the product from the "Serial Number" field.
- “Lot No”: You can also search by lot number from this field.
- In the last part, in the form of "Single Row" or "2. You can select “Multiple rows up to the second unit”.
After making the necessary definitions, press the "Enter" key. The product you selected will be added to the basket.