Inventory Receipts
Inventory Receipts is the screen where entry/exit delivery notes related to inventories are processed.
Route: ERP > Sales-Distribution > Shipment-Logistics > Add Inventory Receipt
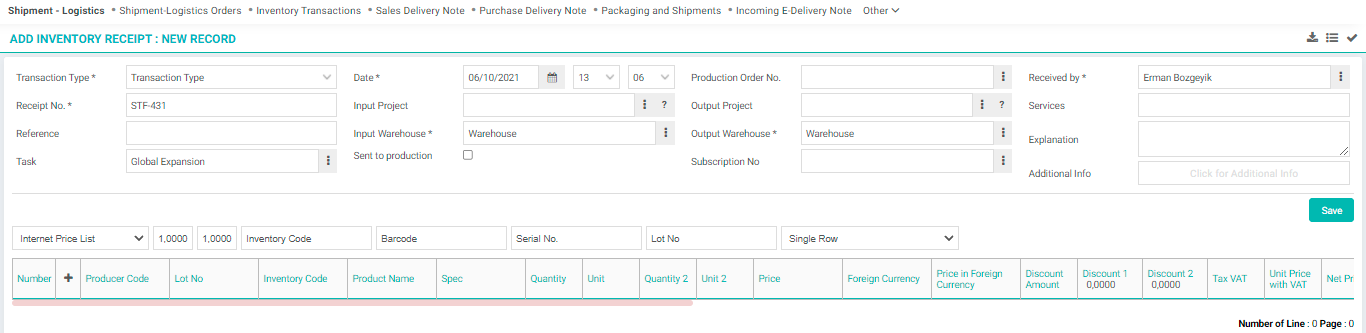
All inventory receipts can be registered on the "Add Inventory Receipt" screen.
The following inventory receipts can be registered on the Transaction Type screen;
- Warehouse Receipt (Inter-warehouses)
- Material Loss Receipt
- Consumables Receipt
- Stock-taking Receipt
- Production Input Receipt
- Input from Production Receipt (Disassembly)
Receipt No: The system will automatically assign a number to the receipt no field.
Reference: In this field, the document number of the previous process is displayed. For example, if this inventory receipt is created directly from a production result screen, the relevant production result number is directly displayed by the system in this field.
Task: If there is a task record associated with this inventory receipt, it can be selected in the Task field. To select the related task, click on the three-dot icon next to this field, click on the link of the related task from the list of tasks that appear.
Date: The date field represents the date the delivery note was prepared. The date of the recording is displayed here. If the delivery note date belongs to another date, enter the date using the icon next to the field.
Input Project: If the products in the inventory receipt are the products to be used in a project, you can select the relevant project in this field. Click on the icon next to this field to select the input project, click on the link of the relevant project from the list of projects that appears.
Input Warehouse: In this field, the warehouse where the products in the inventory receipt will be kept is selected. Click on the icon next to this field to select the input warehouse, click on the link of the relevant warehouse from the list of warehouses that appears.
Sent to Production: Tick "Sent to Production" if it's sent to production.
Production Order No: If the inventory receipt is created as a result of the production order, the relevant production order is automatically displayed here. To select another production order, click the icon next to this field, click the link of the relevant production order from the production orders list that appears.
Output Project: If the product to be found in the stock receipt is the product used in another project, you can select the relevant project in this field. Click on the icon next to this field to select the output project, click on the link of the relevant project from the list of projects that appears.
Output Warehouse: The warehouse where the product/products to be found in the inventory receipt is selected. Click on the icon next to this field to select the output warehouse, click on the link of the relevant warehouse from the list of warehouses that appears.
Subscription No: If your inventory receipt is associated with a subscription, you can select the relevant subscription from here.
Received by: It is used to add the person receiving the order. Click on the icon on the right side of this area and click on the link of the relevant member from the list of members that appears.
Service: For products used in service operations (when a consumable receipt is created), the service application number used is displayed.
Explanation: You can add a description of the inventory receipt.
Additional Info: If you want to add additional information about your inventory receipt, you can use this field. To define additional information;
Route: System > Parameters > System Management > Additional Info
The use of the basket area is as follows;
It is used to select the products to be found in the inventory opening receipt. To add products to the basket, click the "+" icon at the beginning of the basket line. A list of products will appear. Select the received products one by one from here.
You can also add products to the basket by typing the inventory code, barcode, or serial number and pressing the "enter" key. For help on using the Product Basket, see the Basket Settings and Usage document.
After making the necessary definitions, click the “Save” button. The inventory opening receipt information line you added will be added to the “Inventory Transactions” list as “Carryforward Receipt”.
Inventory Receipt Update Screen

On this screen, change/update the information you want and click the “Save” button. In addition, with the help of the icons on this screen, you can do the following;
Related Documents and Notes: You can add documents or notes related to the delivery note. To do this, click on the “Related Documents and Notes” button in the upper right corner of the inventory receipt update page.
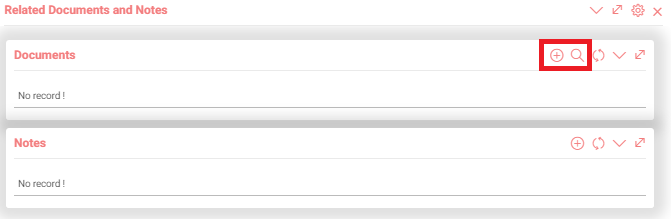
Click the “+” button to add documents. The digital asset add page will appear. After filling the required fields on this screen, click the “Save” button.
In order to associate the inventory receipt with a registered document, on this screen, click on the "search" icon on the dark line that says documents. The digital assets page will appear. You can select the relevant document and associate it with the inventory receipt.
Distribute to Revenue/Expense Items: It is possible to distribute the cost of inventory to expense centers and budget items in inventory receipts such as consumable or waste material receipts. When you click on this field on the inventory receipt screen, the “Distribute the invoice to expense centers” screen will appear.

When you click on the icon shown on this screen, the “Detailed Cost Distribution” screen will appear.

To add cost information on this screen, click on the “+” icon on the dark line. A new line will be added where you can add cost information. This line contains the following fields;
- Expense Center: You can select the defined expense center for the cost you will add. To be able to select the expense center, click on this field and select the relevant expense center from the drop-down submenu.
- Expense Item: You can select the defined income/expense item for the cost you will add. To be able to select the income center, click on this field and select the relevant income/expense item from the drop-down submenu.
- Activity Type: You can select the defined activity type for the cost to be added. To be able to select the activity type, click on this field and select the relevant activity type from the drop-down submenu.
- Work Group: If you are an activity-based cost tracking business, select the defined work group to distribute and track the cost you will add according to the activity type. To be able to select the workgroup, click on this field and select the relevant workgroup from the drop-down submenu.
- Spent By: For the cost to add, select the person who made the expense. To select the person making the expense, click on the icon next to this field, click on the link of the relevant employee from the list of employees that appears.
- Physical Asset: If the cost is related to a physical asset (such as the product that will be in inventory from production, transported by the company's vehicle and fuel cost for this), select the relevant physical asset in this field. In order to select the physical asset, click the icon next to this field, click on the link of the relevant asset from the list of assets that appears.
- Subscription No: You can associate with the subscription here.
- Project: If the cost is related to a project, the relevant project should be selected in this field. In order to select the relevant project, click on the icon next to this field, click on the link of the relevant project from the list of projects that appears.
- Rate and Amount: Add the rate and amount information of the product cost to be used for production.
Notifications: You can view the added Approvals and Notifications here.
Accounting Transactions: You can view the accounting transactions for the transaction you selected from this field.
Warranty - Serial Numbers: You can access the "Serial and Lot Transactions" screen by clicking this field.
After making the necessary definitions, click the “Save” button. Otherwise, your transactions will not be recorded.