Promotion Management
The Workcube Promotion Module allows you to create and update different price lists for different customer categories, and to prepare and announce special promotions for customer groups with the promotional tool.
Route: ERP > Sales-Distribution > Promotion Management
Promotion management works in one-to-one integration with the sales module. Promotions defined in the sales module are queried in the order records and the results are displayed on the order page immediately.
The subject of the promotion can be order quantity, order size, instant discount, products, and shopping cart content. By separating the product and content from the layout, it gives direct control over the presentation and promotion of the product.

A list of promotions registered in the system is published on this page. It is also possible to define a new promotion from this screen. Click on the red "+" icon on the screen to define a new promotion. You will see “Promotions: New Record”.
Note: If you click on the icon on the right, you will see the add batch promotion screen.
Adding a Promotion

Active: Check to activate the promotion.
Subject: Type the Subject (title information) for the promotion. Example: Cologne Campaign
Process: Select the process information defined in this field (Stages may vary according to company processes. (For example, first registration / first registration> sales approval, etc.)
Supplier: In the Supplier field, click on the icon next to it to select from which supplier you purchased your promotional product and select the relevant member from the list of members that appears.
Campaigns: The campaign field represents the campaign that the promotion is associated with. Click on the icon on the right side of this area and select the relevant campaign from the promotions screen that appears.
Note: If the promotion is not within the scope of a campaign, you should not take any action in this area.
Catalogue: The catalog it will be included in is selected.
Explanation: You can add an explanation for the promotion.
Sales Limit-Target: To set a Sales Limit or Target, enter the number you set in this field.
User Friendly URL: Add the User Friendly URL from here.
Banner ID: Enter the Banner ID.
Promotion Code: Add promotion code from here.
2-Conditions;
Starting Date: Specify the promotion start date and start time.
End Date: Specify the end date and end time of the promotion validity.
Promotion Type: Select the promotion type. According to your choice here, the promotion can be applied to the line, to the collection or periodically.
Shopping Amount: This field represents the amount of purchases on which the promotion is based.
In case of an order higher than the value entered here, the promotion calculation is made automatically by the system and displayed on the order page. In order for the promotion to be calculated, a value must be entered in this field.
The amount of shopping is expressed in units or amounts.
Here “Unit” is the unit of the product with which the promotion is associated.
"Amount" is detected and calculated in the main currency (eg USD) that the system basically recognizes.
If the promotion will be calculated on the basis of the product unit, make the first field "unit" selected and enter the minimum purchase amount required to qualify for the promotion. If the promotion will be calculated over the shopping amount, make the first field “amount” selected and enter the minimum shopping amount required to qualify for the promotion according to the system currency.
Note: In both cases, write the numbers with no spaces or marks between them.
Price List: The Price List field is used to select which price list the promotion will be applied to. Click on the field and select the price list on which to calculate the promotion. If you do not take any action in this field, the system will calculate the standard sales price.
Card Type: Card type is selected.
Product Category: In this field, you can select the product category for which the promotion will be valid. Click the icon next to this field to select the product category. Click on the link of the relevant category from the categories page that appears. Product categories are set in ERP > Sales-Distribution > Product and Stocks > Product Category Management.
Brand: In this field, you can select the brand for which the promotion will be valid. Brands are set in Dashboard > System > Parameters.
Product: In this field, you can select the product for which the promotion will be valid.
All Products: By selecting this box, the promotion will be applied to all products.
3-Instant Gains and Gains on Next Shoppings
Earn Discount: Discount earning percentage is indicated.
Win the Same Product: Enter how many pieces of the same product will be won.
Win a Special Product: When this product is purchased, it is entered with all the details of which special product will be won.
Shopping Coupon: It is specified which shopping coupon will be received.
Money Points: Enter how many money points will be earned.
Note: Free items, gifts, and points are multiplied by multiples of the minimum purchase amount and displayed on the order page. That is, if the order amount is three times the specified minimum purchase amount, the customer will receive three free items, gifts, or triple points.
4- Icon
Promotion Icon Allows you to select the icon to be used to draw attention to the promotion on the website. The icon selected here is displayed with the product information on all pages where the product is located in the public or partner portal managed with WorkCube.
Note: If you want to show Special Code in the promotion detail or if you want to make some settings like this, don't forget to check the XML settings.
Updating Promotional Information
Click on the “Update” icon next to the promotion title. The Promotion Update page has the Promotion ID in addition to the fields on the Promotion definition page. The promotional number is automatically generated by the system.
After every change and addition made in all fields, the "Update" button should be clicked.
Adding Batch Promotion
Workcube allows you to define promotional information for more than one product at once. To do this, click on the icon on the right side of the “+”. The batch promotion add screen will appear.
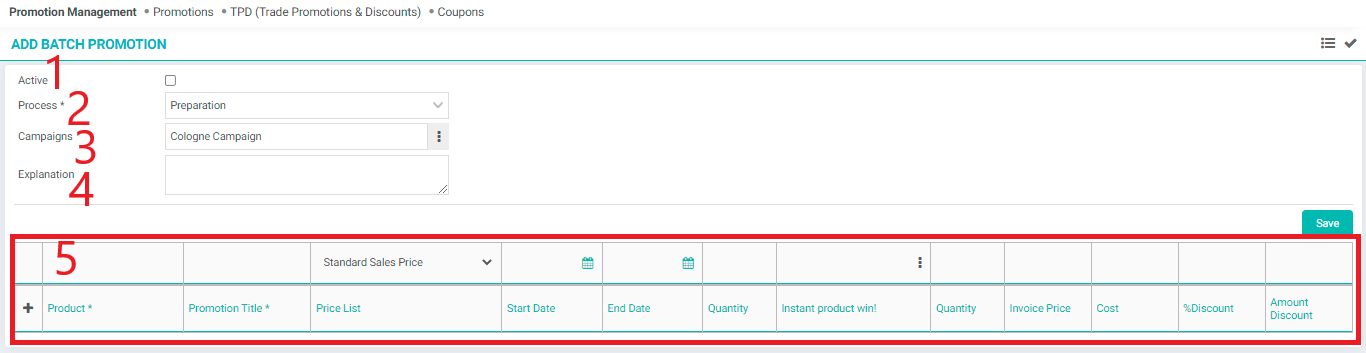
As in promotions, the necessary information should be added to the following fields;
1-Active: Check the Active box so that the campaign can be used actively (to be processed).
2-Process: Select the process information defined in this field (Stages may vary according to company processes.)
3-Campaigns: The campaign field represents the campaign to which the promotion is associated. Click on the icon on the right side of this area and select the relevant campaign from the promotions screen that appears.
Note: If the promotion is not within the scope of a campaign, you should not take any action in this area.
4-Explanation: You can add a description for the promotion.
5-Add the products included in the promotion to the Basket field.
All the information you specify in the fields above the basket area will be reflected on all the products you add to the basket at the same time. In this way, you will be able to process many products at once. You can also make changes on lines that require different information/conditions.
Batch Promotion Update;

To update the batch promotion, click on the "Update" icon on the right side of the relevant line from the promotions listed on the promotion page. The batch promotion update page will appear in front of you.
On this screen, you can add products to the basket by using the “+” icon or remove products from the basket by using the “-” icon and update the information. After making the relevant updates, click the “Update” button. Click the “Delete” button to delete the promotion.