Warehouse and Space Management
Workcube Warehouse and Space Management module provides efficient storage and fast distribution of goods by dividing warehouses into locations and shelves. It reduces storage and logistics costs.
Workcube Warehouse and Space Management Functions
- Unlimited number of warehouse definitions
- Unlimited location space definition depending on the warehouse (with width / height / depth information)
- Define a warehouse-related branch office
- Define warehouse manager(s)
- Defining periodical product category fields on the basis of warehouse and location
- Defining periodic shelf information on the basis of product, warehouse, and location
Creating Warehousing Spaces
Space management is used to manage all kinds of physical inventory spaces (warehouse, store, etc.) where products and stocks are kept. Workcube Inventory module offers detailed warehouse, location, and shelf management. Warehouses and branch offices can be associated and it is possible to add an unlimited number of locations to each warehouse (or store). As well as assigning employees responsible for warehouses, field management can be performed on the basis of product categories.
There are some definitions that must be made before creating a warehousing space in the system. These:
- Branch office definitions
- Department definitions
Note 1: Branch office definitions are made on the Branch offices page.
ROUTE: HR > Planning > Organization Planning > Branch Offices
Note 2: Department definitions are made on the Departments page.
ROUTE: HR > Planning > Organization Planning > Departments
Note 3: Warehousing Spaces can be created after the relevant definitions are completed. The Warehouse Space page is used to add Warehousing Spaces.
ROUTE: ERP > Sales-Distribution > Warehouse and Space Planning > Warehousing Spaces

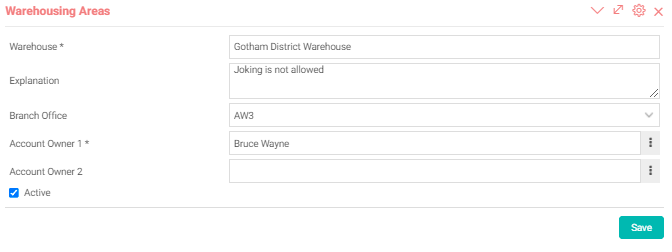
Warehouse: The name of the warehouse is automatically dropped under which storage space is opened.
Location Code: This is the area where codes are defined for locations.
Explanation: It is the field where the name of the location to be opened is defined.
Type: It is the area where the type of products to be used for the storage area is selected. (Raw Material, Goods, Finished, Consignment)
Size: This is the area where the location dimensions are defined.
Accounting Code: This is the field where the accounting codes of the location are selected.
Active: The “Active” box must be ticked in order for the locations to be traded.
Prioritized Location: This is selected if the warehouse has a priority among locations.
Service Location: If this location is selected, it is used to see the inventory separately for the given service operations.
Location of Scrap: If the products in this location will be considered as scrap, this box is ticked.
Closeouts Location: The products left at the end of the season (outlet) are tracked from this stock.
Recycling Location: Location of recycling.
Quality Location: Location of quality control.
Sale is not possible on this location.: This box is not used for sales transactions in selected locations. For example, suppose this option is selected for a location A. When location A is selected in a sales invoice and tried to save, it will give a warning as “Sale is not possible on this location”.
The inventories in this location belong to 3rd party company and individuals: If this box is selected, the current account field will appear at the bottom of the page.
Don't do cost transaction: If this field is selected, the transactions in the location do not create any cost.
Measurements
Measurements: It allows to keep values such as temperature, pressure, and humidity in locations. Records are kept in Database tables. Integration is required.
It comes from the Measurement Name and Unit: Parameters > Measurement Parameters definitions. Units of Measure are Abbreviations.
Minimum and Maximum Value: Indicates the minimum and maximum values that the environment variables in the location can take.
Measured Value: Instantaneous values measured by integration from the device on the Location/Asset. Values are kept in the database.
Physical Asset: There may be more than one physical asset in a Location, and assets may need to be well tracked for different values. For this reason, measurement values for different assets in the location can be kept under control by defining the physical asset.
Shelves connected to locations are defined by the + icon in section 3. At the same time, shelf definitions can be made with the Shelves page.
ROUTE: ERP > Sales-Distribution > Warehouse and Space Planning > Shelves
Status: The “Active” box must be ticked in order for the shelves to be processed.
Location: The warehouse and location of the relevant shelf are selected from this field.
Shelf Code: Code definition for each shelf is made in this field. For example, while only size 36 women's sneakers can be placed on one shelf (36-KSA), it may be desirable to place "M" size men's sweaters (EK-M) on another shelf. In this case, meaningful codes can be applied to the shelves.
Shelf Type: The shelf type defined for the shelf is selected.
Size: It is the area where the shelf dimensions are defined.
Explanation: This is the field where annotations for the shelf are written.
Date Interval: This is the field where the product will be found at the relevant location and shelf.
Inventory: In this field, the product to be kept on the shelf is selected.
Quantity: The total number of products to be kept on the relevant shelf or how many products will be displayed on the front of the shelf is written.
Note: The page is used to add shelf types. Examples of shelf types are Heavy Load, Light Load, and With Lid.
ROUTE: Dashboard > System > Parameters > Shelf Category

Note: In order for the shelves to be listed on the Warehousing Spaces page, the "Display Shelf Information" setting must be selected as "Yes" by going to the page.
ROUTE: Dashboard > System > Page Settings

Category Based Space Management
ROUTE: ERP > Sales-Distribution > Warehouse and Space Planning > Category Space Plans
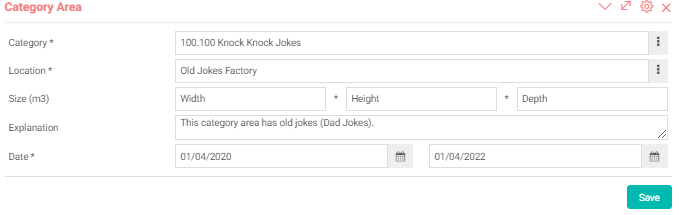
Category: The product category is selected from this field.
Location: The location where the selected product category will be followed is selected from this field.
Size: The size information reserved for the product category in the location is defined in this field.
Explanation: It is the field where annotations are entered.
Date: The dates between which the product category will be followed at the relevant location are indicated in this field.