Fundamentals of Inventory Management in Workcube
The Inventory Management module is the module where all transactions related to the stocks of physical goods sold and purchased are carried out and managed. The module works in integration with other Workcube modules such as sales, purchasing, production, product, and invoice.
The product management logic in Workcube is as follows: a basic product is added to the system once from the product management module and instead of registering additional products for different variations of that product that do not affect the price, only stock codes are defined.
For example, Ace Bleach 2 lt is a single product. Spring / Pine / Lavender scented versions of this product are defined and managed in the system with separate stock codes as product variations. In this way, in a company that manages thousands of SKUs (Stock Keeping Units), the number of products can be much less than the number of SKUs.
This setup in Workcube Product - Inventory Management makes many activities in product management, from price changes to supplier management, much faster and more effective, while keeping track of our products on the basis of inventory in the lowest breakdown.
The Inventory Management module is the module where all transactions related to the stocks of physical goods sold and purchased are carried out and managed. The module works in integration with other Workcube modules such as sales, purchasing, production, product, and invoice. It is located on the ERP > Sales - Distribution > Product & Stocks > Inventories page.
Note: The inventory management module is a module related to all functions that affect the movement of goods. Therefore, it should not be forgotten that the records in the inventory module should be made with great care and changes to be made may cause changes in all other modules.
In order to be able to perform inventory management effectively, some settings must be made;
- Warehouses to be used in inventory management and goods entry and exit should be defined in the system via the ERP > Sales - Distribution > Warehouse and Space Planning > Warehousing Spaces page.
- All input and output products that provide inventory movement should be defined in product management. When the "Subject to Inventory" checkbox is checked in the defined product detail, the product is displayed in the inventory transactions. You can remove the "Subject to Inventory" checkbox of the products that you do not want to track Inventory.
- If you tick the "Operate with Zero Inventory" checkbox, you can receive sales orders even if the inventory amount is zero or negative balance.
- Correct entry of other information such as category information, product code, manufacturer code will give you an advantage in inventory processes.
Defining Product Inventory Code
Inventory Code;
When adding new products to sales and purchase orders, product variations with an Inventory code are displayed as separate headings in the list and can be selected and ordered separately.
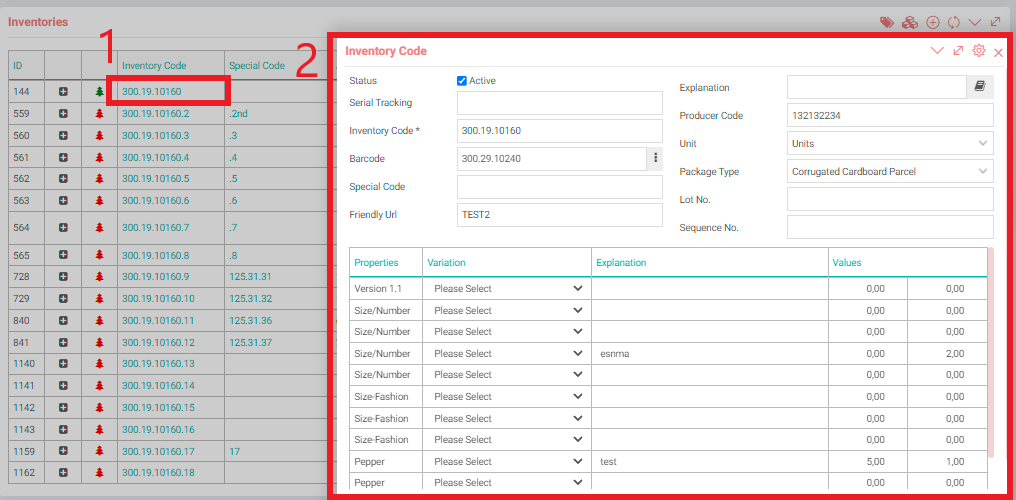
To define a new “Inventory Code”, when you click on the “+” from the inventory field on the product card, the Inventory Code screen will appear.
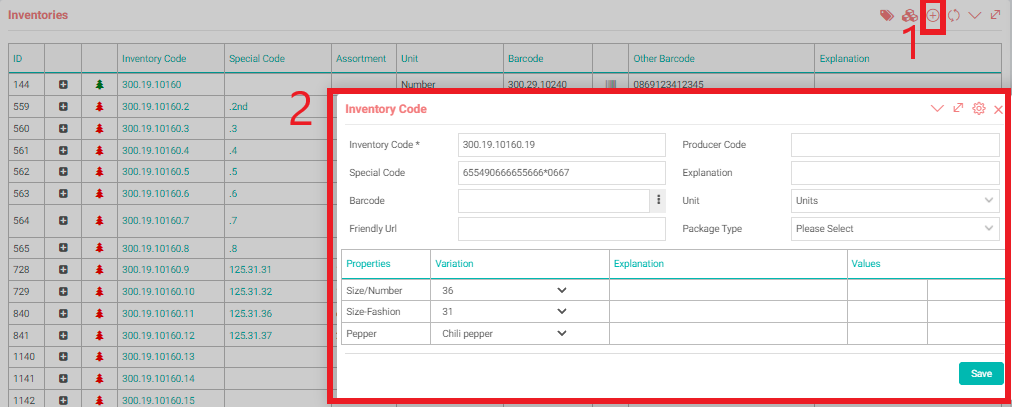
- Inventory Code: Inventory Code will be created automatically when the product is registered.
- Special Code: If a special code is followed for the product, it can be assigned automatically by the system or it can be written manually.
- Barcode: This field displays the barcode information recorded on the product registration screen. When you add an inventory code other than this one, this field is blank. Type the barcode information of the new inventory code in the barcode field.
- Producer Code: If the product is a supplied product, enter the product code of the manufacturer you supplied in this field.
- Explanation: You can add an explanation about the product. A name describing the product must be written in the explanation field. Otherwise, the product name will be the same as the main product and cause confusion in the list.
- Unit: Select the unit where the product will be traded.
- Package Type: Choose the package type.
- Variation: If there are different variations of the product, you can select this variation and write the description and values for the variation.
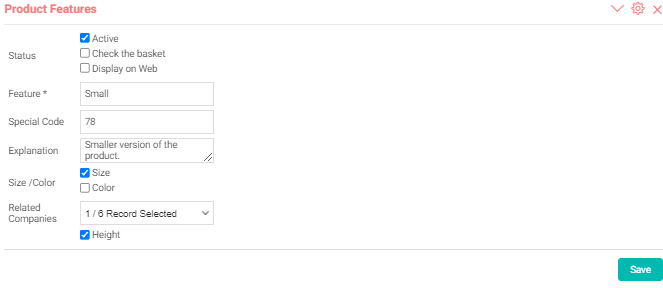
To define a product feature, click the “+” button in the ERP > Sales - Distribution > Product and Stocks > Product Features field. The feature screen will appear. After making the relevant definitions on the feature addition page, click the Save button. In this way, variations can be added to the defined feature. To add a variation to a feature, go to the Product Features list page and click the edit icon.
Warning: In order to carry out sales, purchasing, and inventory tracking operations on the defined feature variations of the product, a separate inventory code must be defined for all the variants of the feature. First, the product features must be defined. Then, the inventory code must be defined for each feature variation one by one.
- When adding new products to sales and purchase orders, product variations with inventory codes are displayed as separate headings in the list and can be selected and ordered separately.
Warning: It is necessary to create different combinations of features for different packages of products with both unit and feature definitions at the same time. E.g; For a product that has 4 different scents and is also sold in pieces and in a box, additional inventory codes are defined for 4 different scents of each item, and the inventory codes must be defined separately for 4 different scent combinations of the box. This is necessary in order to be able to accurately track how many pieces we have of each product with different features.
Note: There is a field for each attribute and additional unit defined on the inventory code screen. You can use the "Inventories" field at the bottom of the product update screen to add
Inventory Information Update;
You can access and update inventory information by clicking the links related to inventories from the inventory space at the bottom of the product update screen.
You can write the Inventory Explanation / Name in Different Languages;
On the inventory code update screen, you can add explanations for inventories in different languages. To do this, click on the icon next to the explanation field. The dictionary screen will appear. On this screen, you can write the equivalent of the explanation of the inventory information in different languages.
Adding Batch Inventory Information;
You can add batch inventory information from the inventory field. For this, click on the search icon at the top of the inventories information section.
You will see the product screen where you will add batch inventory information.

The point to be noted here is that the features of the selected product become passive after registration, the checkbox for this feature cannot be removed.
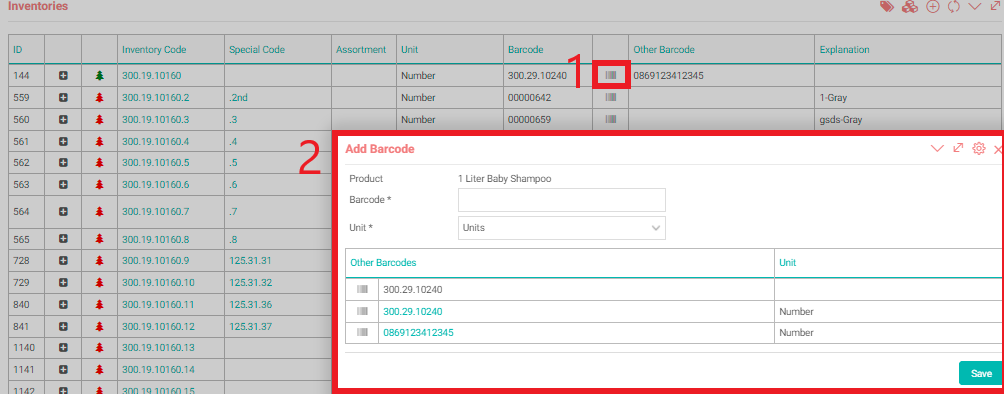
Defining Product Inventory Barcodes
Different product inventory barcodes can be defined in order to follow the barcode changes related to the products and the inventories of the same product in different barcodes.
To define the inventory barcode, click on the barcode icon next to the relevant inventory code in the inventories section of the product card.
Each barcode number you add will be displayed on the left side of the screen.
Accessing Product Inventory Details
As soon as a new product is registered in the system, the inventory detail page for that product is automatically created by the system.
You can access the inventory management page of that product by clicking the "Inventory Detail" link at the top right of the product page.

- Transactions: All transactions of that inventory can be viewed in the Transactions section.
- Product: Click to go to the product page.
- Spec: In this section, inventory tracking is done on the basis of spec.
- Locations: In the warehouses, you can view the stock quantities in the locations within the warehouse spaces as a separate list on this screen.
- Other: Product cost and cost history are displayed in the Cost section. In the Prices section, the standard purchase and sale prices are displayed as the last purchase and sale prices.
- Total Inventory: Graphic of the product's inventory can be seen here.
- List: You can access inventory search page by clicking this button.
- Notifications: From this area, you can view Approval and Notifications related to the product added through the system.
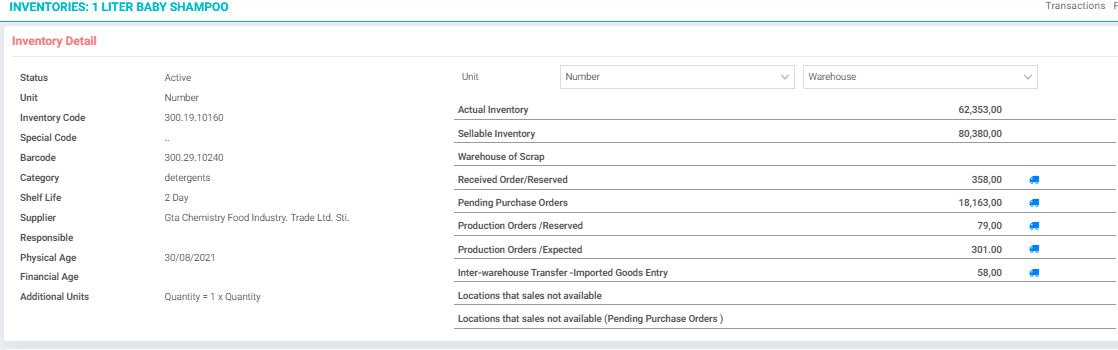
Note: In the "Unit" at the top, the inventory quantities are listed according to the selections made in the Quantity and Warehouse fields. If the warehouse is not selected, the total inventory amount in all warehouses is displayed.
- Actual Inventory: Displays the amount of inventory that is physically in the warehouses at the moment.
- Sellable Inventory: Displays the amount of inventory that can be sold at the moment. (Reserved inventories are deducted from actual inventories to find the amount of Sellable Inventory.)
- Warehouse of Scrap: Products seen as scrap are transferred to scrap warehouses, preventing them from being included in Sellable Inventory. In addition, products in such locations can be sold while the production plan is being made, and they are prevented from being included in the actual inventory. Thus, scrap products are kept intact and separate from usable products.
- Received Order / Reserved & Placed Order / Pending: The information in these fields is transferred to the inventory detail from the sales and purchasing modules.
- Production Orders / Reserve & Production Orders / Expected: Shows the status of production orders.
- Inter-warehouse Transfer - Imported Goods Entry: Shows information about the transfer of imported goods to warehouses
- Locations that sales not available & Locations that sales not available (Placed Order Pending): “Not on sale” option can be selected in some Locations. When this option is checked, the inventory amounts in those locations are displayed here.
With the Total Inventory button on the top right of the page, the inventory distribution chart of that product is displayed along with its variations.

Inventory Strategies
Each inventory code line defined in the product card is automatically added to the Inventory Strategies section on the Inventory Detail screen. Inventory strategies must also be defined separately for each individual Inventory item. Check the article called "Inventory Strategies" for detailed information.

Warning: Don't forget to click the "Save" button after every change you make in the fields.